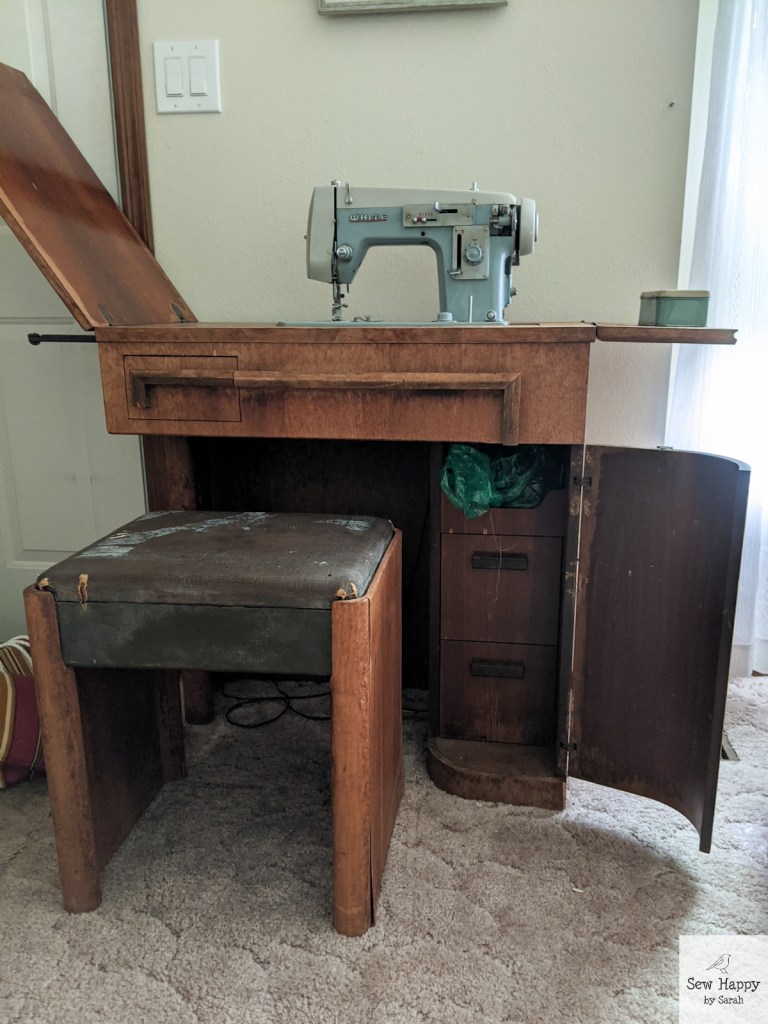
I wasn’t in the market for another sewing machine, but my latest just appeared and I couldn’t pass it up! It all started when my mom was trying to decide what to do with her old sewing desk. It was in rough shape and had been sitting unused for a long time. It was an extra piece of furniture that was moved a few times over the years, had somehow lost all of its varnish and looked so weathered. It had originally been her mother’s.
We proceeded to take a closer look at the desk to see what exactly was inside of it. The most we were expecting was perhaps some old items in the drawers, but much to our surprise, she opened the top and there was a sewing machine inside! She had no idea it was hidden in the desk these past 30+ years.
This vintage White brand machine, model number 2134, was her machine and dates back to somewhere around the mid-1960’s to 1970. When we lifted it up from inside the desk, it was understandably dirty and covered in flakes of varnish. I plugged it in and the motor worked! It was a bit difficult to move the needle at first, but I later oiled it up and got it moving great again. It can sew a straight stitch and a zig zag. The exterior cleaned up well, too! Luckily with just a bit of Dawn soap and water, it now looks nearly pristine! Spending so much time out of the daylight probably helped to keep it looking so good.
The machine weighs a lot with its metal body and all metal insides. This also makes it an awesome heavy-duty machine. Once I had it running smoothly, I put it to the test with multiple layers of fabric and foam stabailizer that I use for making bags to see if it could handle it. The layers quickly and easily glided through with a great stitch!
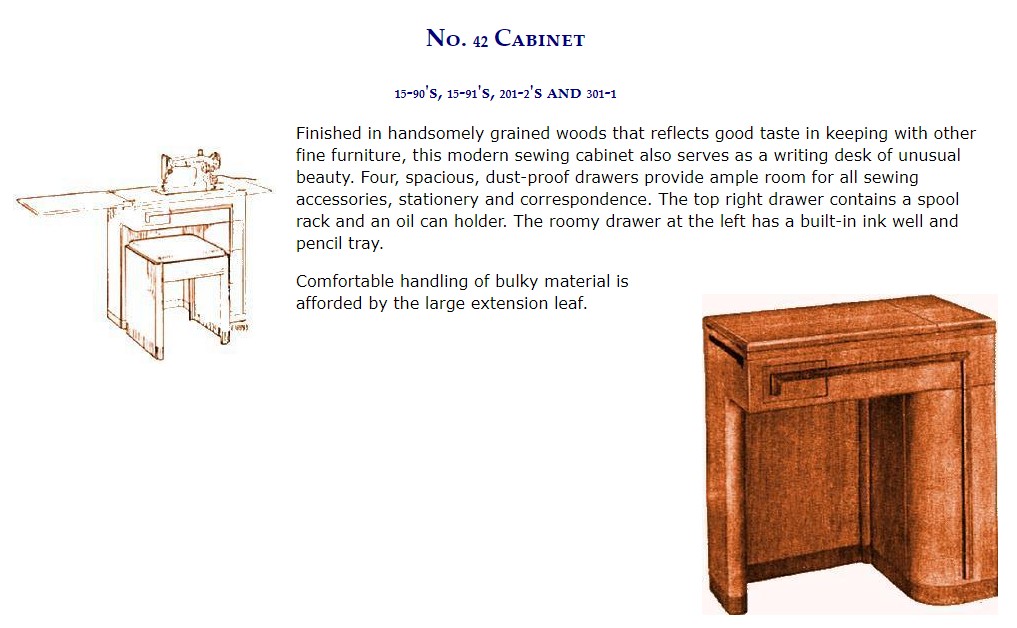
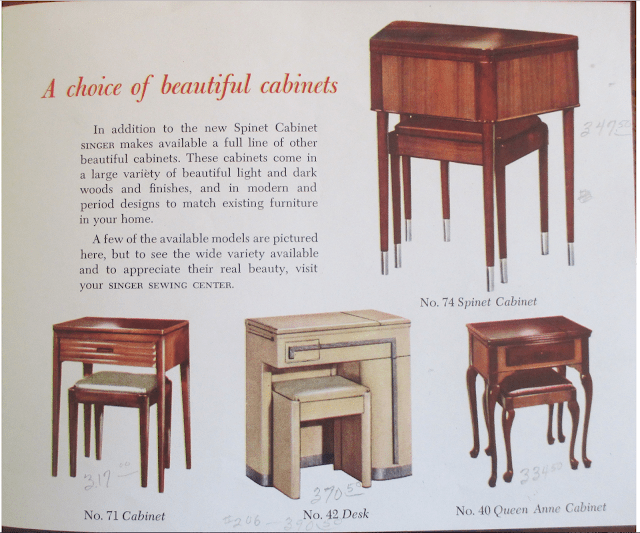
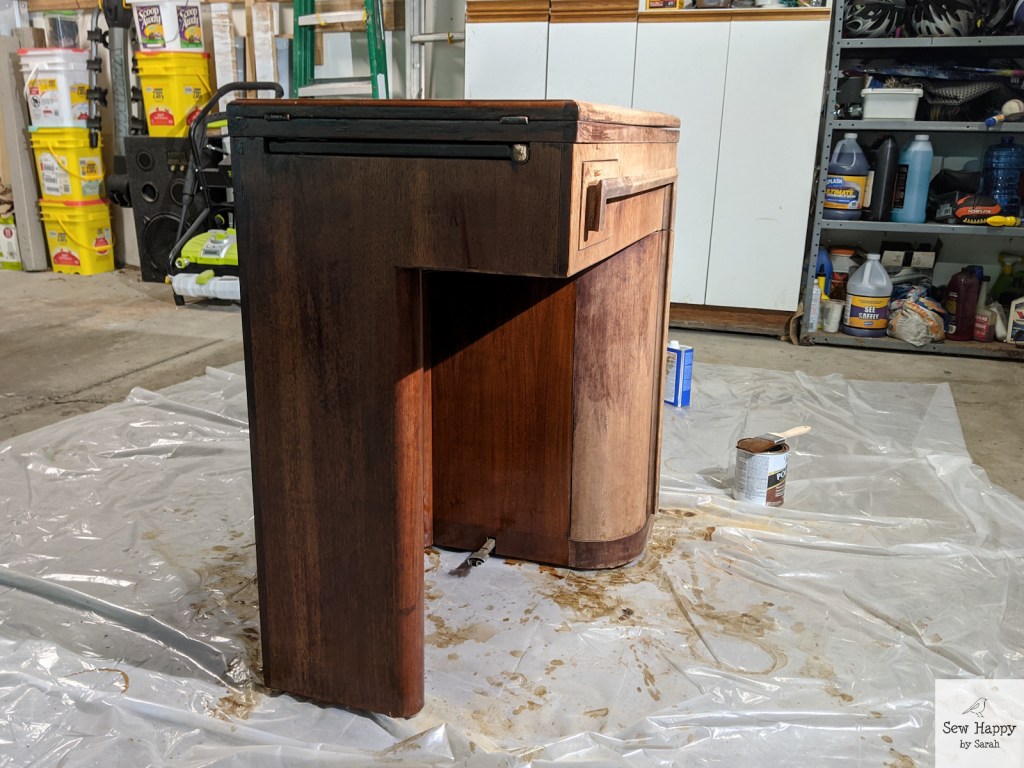
Since it was clear I needed to keep this machine and give it a new sewing life, I had to do something about its cabinet. The cabinet originally held a Singer machine (which is long gone) and after some research I found it is called the Singer Art Deco Cabinet #42. I looked up pictures to see what it once might have looked like and came across some copies of orignal advertisements for the desk.
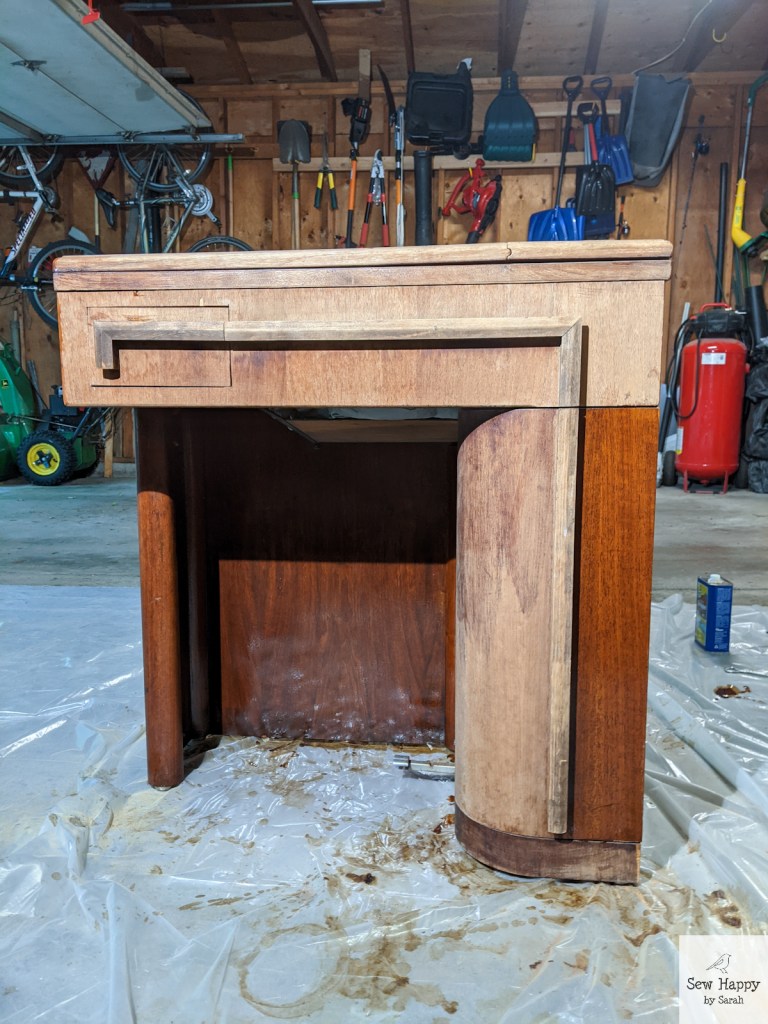
I have never been interested in refinishing furniture, but I thought I’d give this a shot. I stripped off what little stain remained and got to work re-staining it. These pictures show how much of a difference adding one coat of stain was next to the bare wood it had become.
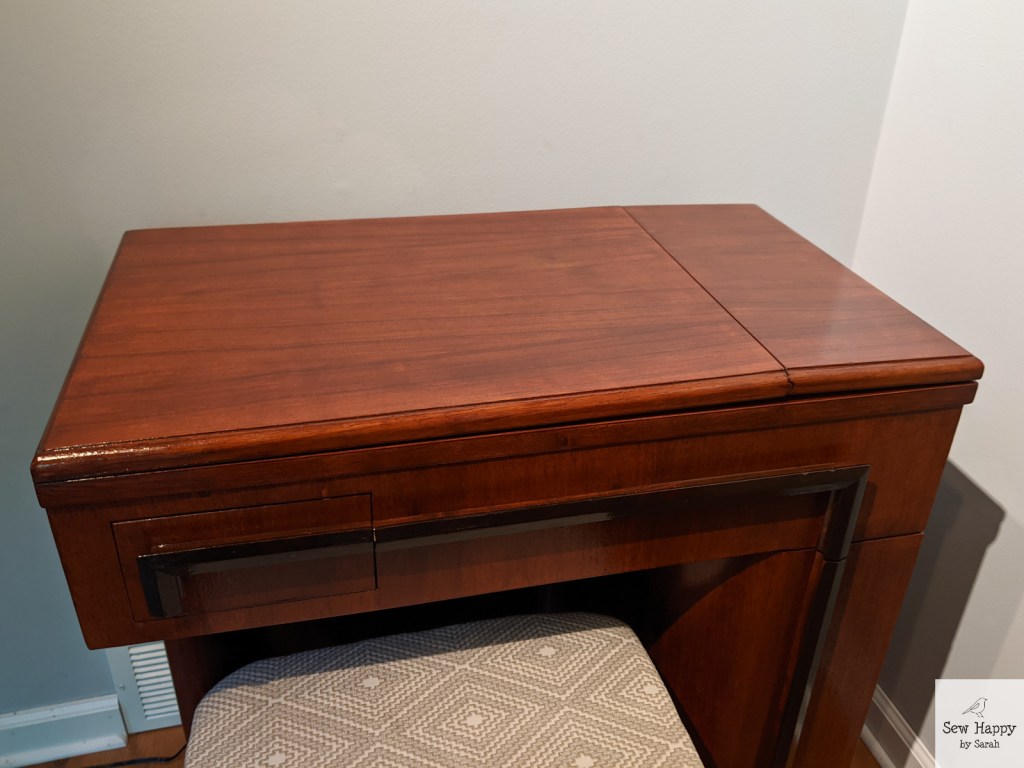
After a week of work, I absolutely love how it turned out! It definitely has new life and looks so fancy with its glossy finish. It actually makes the machine look even better! The desk now resides in my living room because there is no room left in my sewing room. Oh well. It is such a fine piece of furniture that it looks better there anyway! I will just have to make a point to sew out there sometimes.
I also stained and re-covered the stool to complete the makeover. My piano bench was overdue to be reupholstered and I had already purchased some home decor fabric for it months ago. I took the measurements and realized I had exactly enough fabric to cover both pieces! Since they are right next to each other in my living room, they now tie together so well.
From this experience, I can see why some like to rescue and restore vintage machines. I enjoyed taking apart the machine and analyzing how the gears work to get it back to working order. It’s such a great machine it deserves to be used again! With this resoration complete I better get sewing!
Table runners are perhaps one of my favorite types of quilting projects to make. You get the experience of making the quilt blocks, but you don’t have to make too many of them. Plus, the time it takes to quilt and bind the finished product is so fast compared to a large quilt!
Earlier in June, I attended a weekend-long virtual quilt retreat run through Millie P’s Quilt Shop. The theme of the retreat was “Tabletastic 2” and we were to make three specific table runners from Doug Leko’s new Tabletastic! 2 book. This book is excellent, as is its predecessor, Tabletastic!, with high-quality step-by-step instructions for a variety of runners and table toppers. Through demos and instruction from the staff at Millie P’s all weekend, I was able to complete all three runners during the retreat. What a fun event! As a bonus, there was even a guest appearance by Doug on our Zoom call. It was so great to be able to meet him!
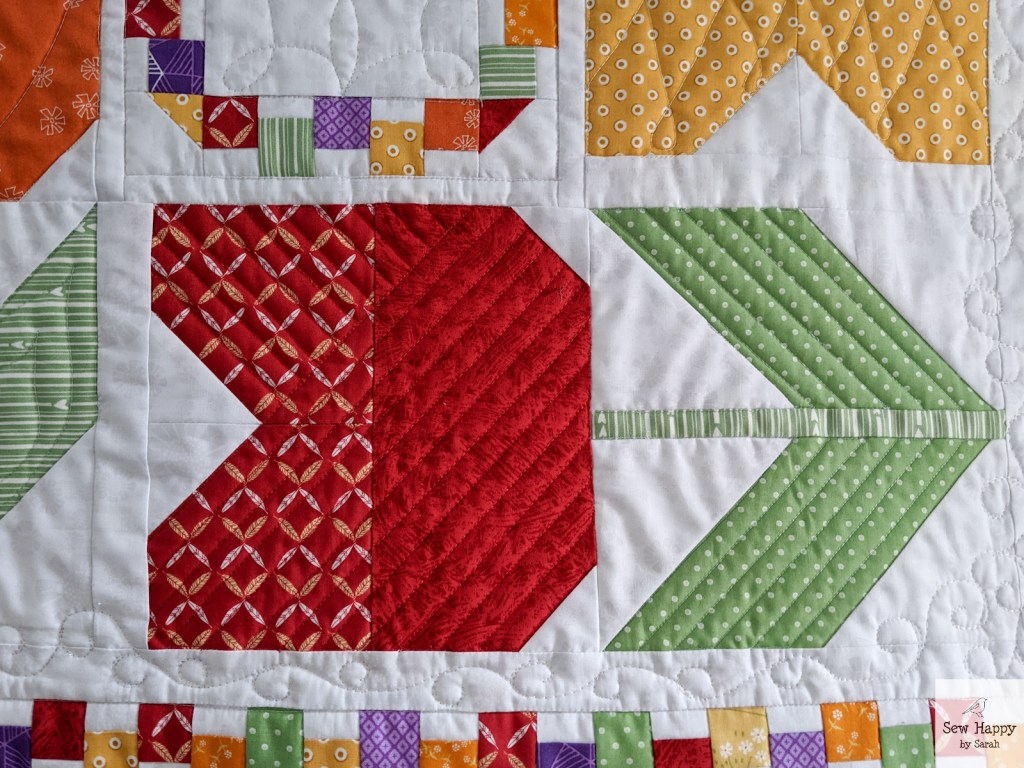
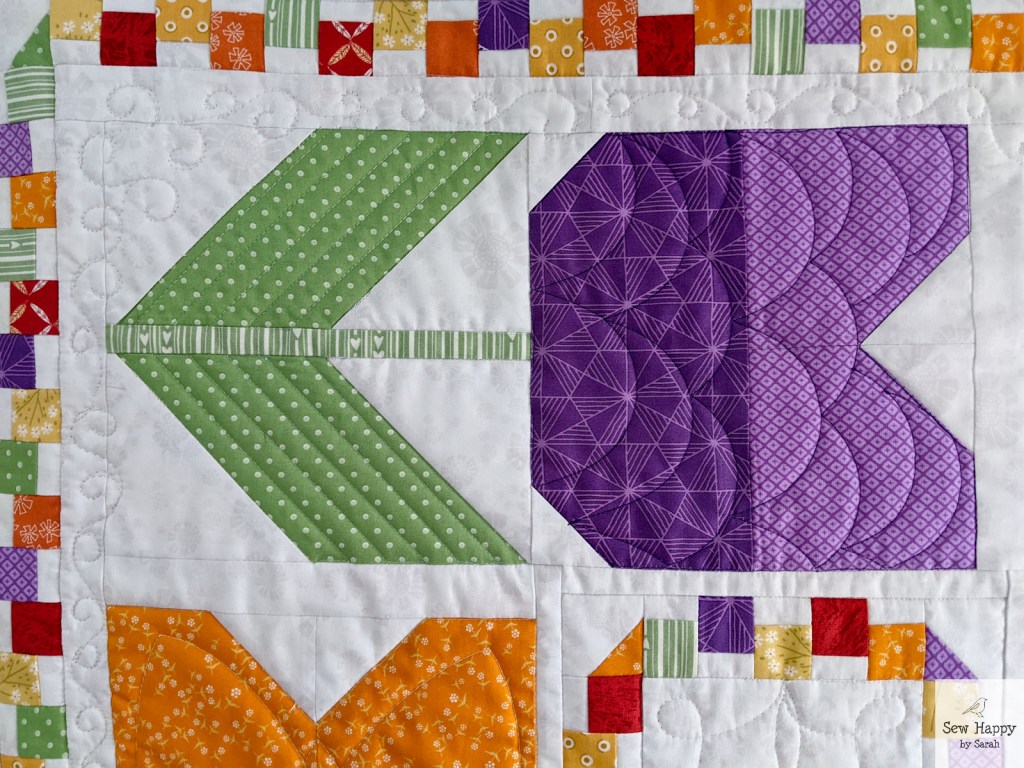
So far in my quilting journey, star blocks are my favorite. The unique interlocking stars in the Cotswolds runner really appealed to me and it was fun to make. As precise as I was trying to be, I still managed to lose a few star points… Not sure what went wrong there, but I think it happened while trimming my flying geese blocks. So, per recommendation of the Millie P’s staff, I have now purchased an Ultimate Flying Geese Ruler which I hope will help me next time!
For a smaller project like this I could have quilt it on my regular sewing machine, but I decided to throw all three runners on the longarm to get more practice. For the quilting on this one, I experimented a bit to try to emphasize the interlocked shape the stars create by making a design that flows from one star into the next. I also played around with the negative space around them.
Stay tuned for the other two runners coming soon! 🙂
Finished Size: 16" x 48"
Pattern: Cotswolds table runner from the Tabletastic! 2 book by Doug Leko/Antler Quilt Designs
Fabric: Sophie by Brenda Riddle for Moda
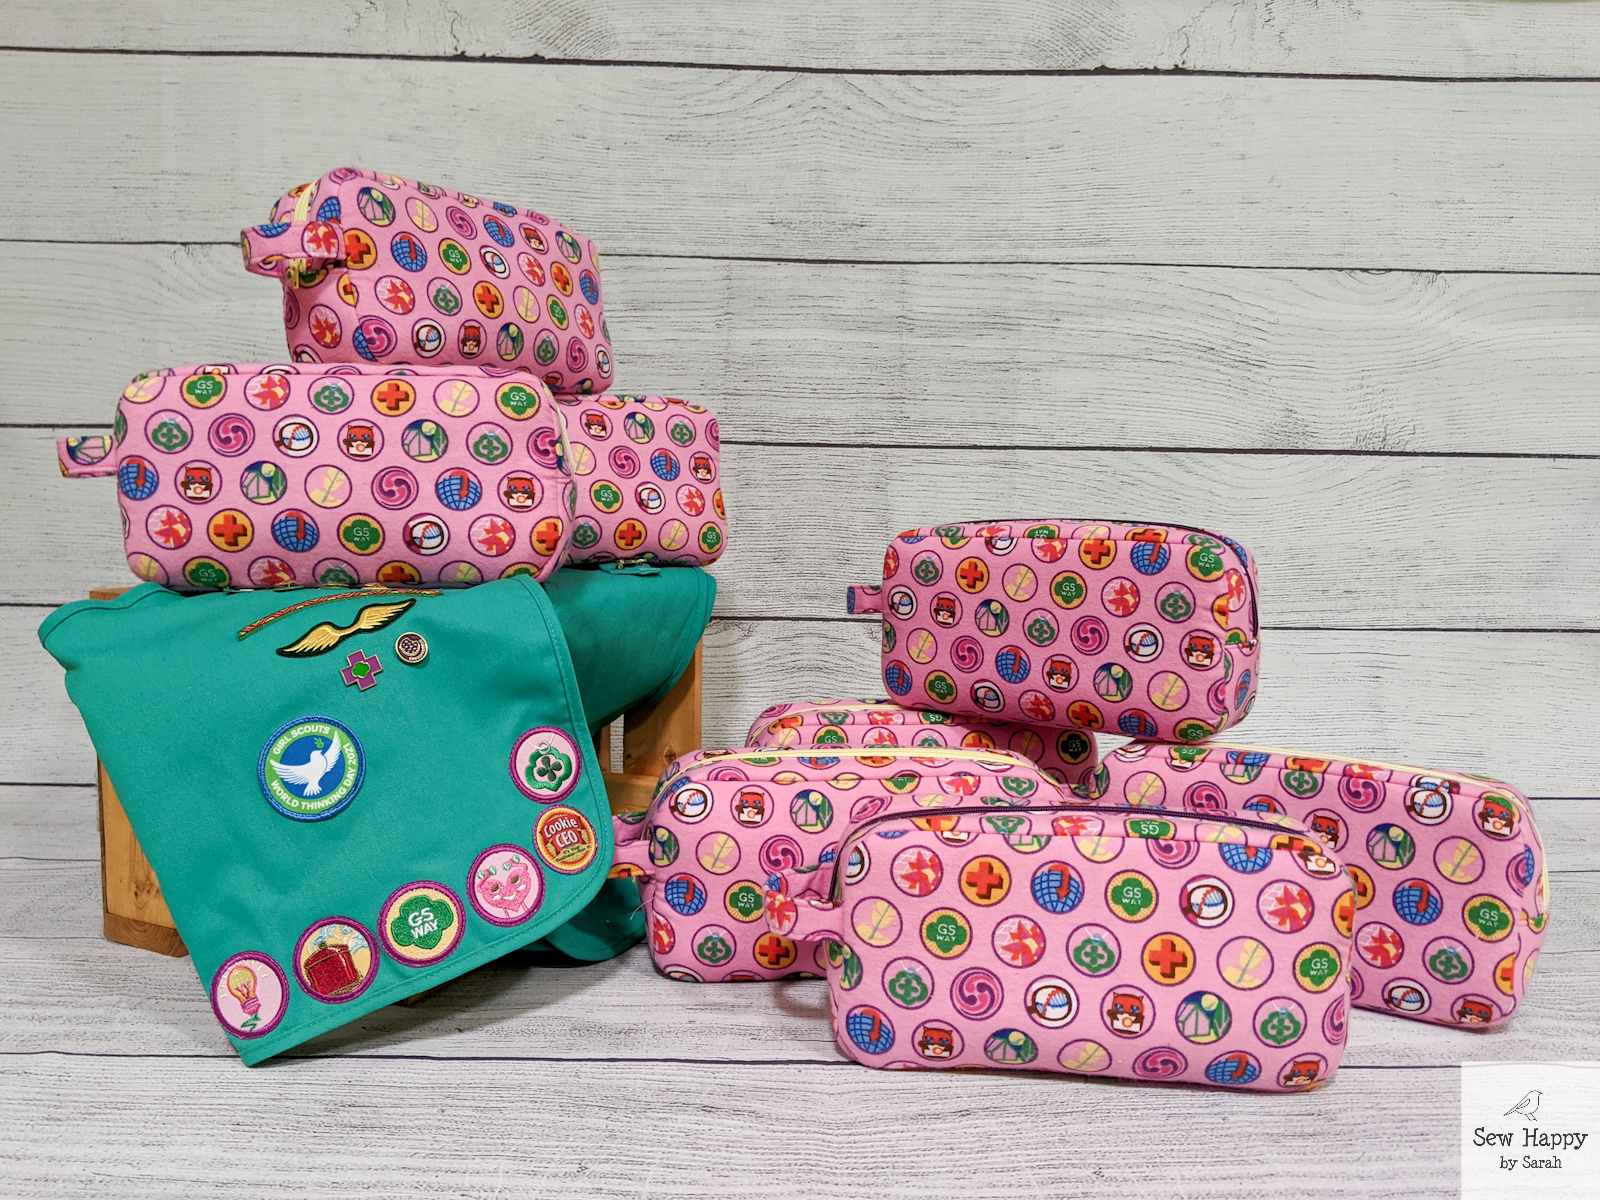
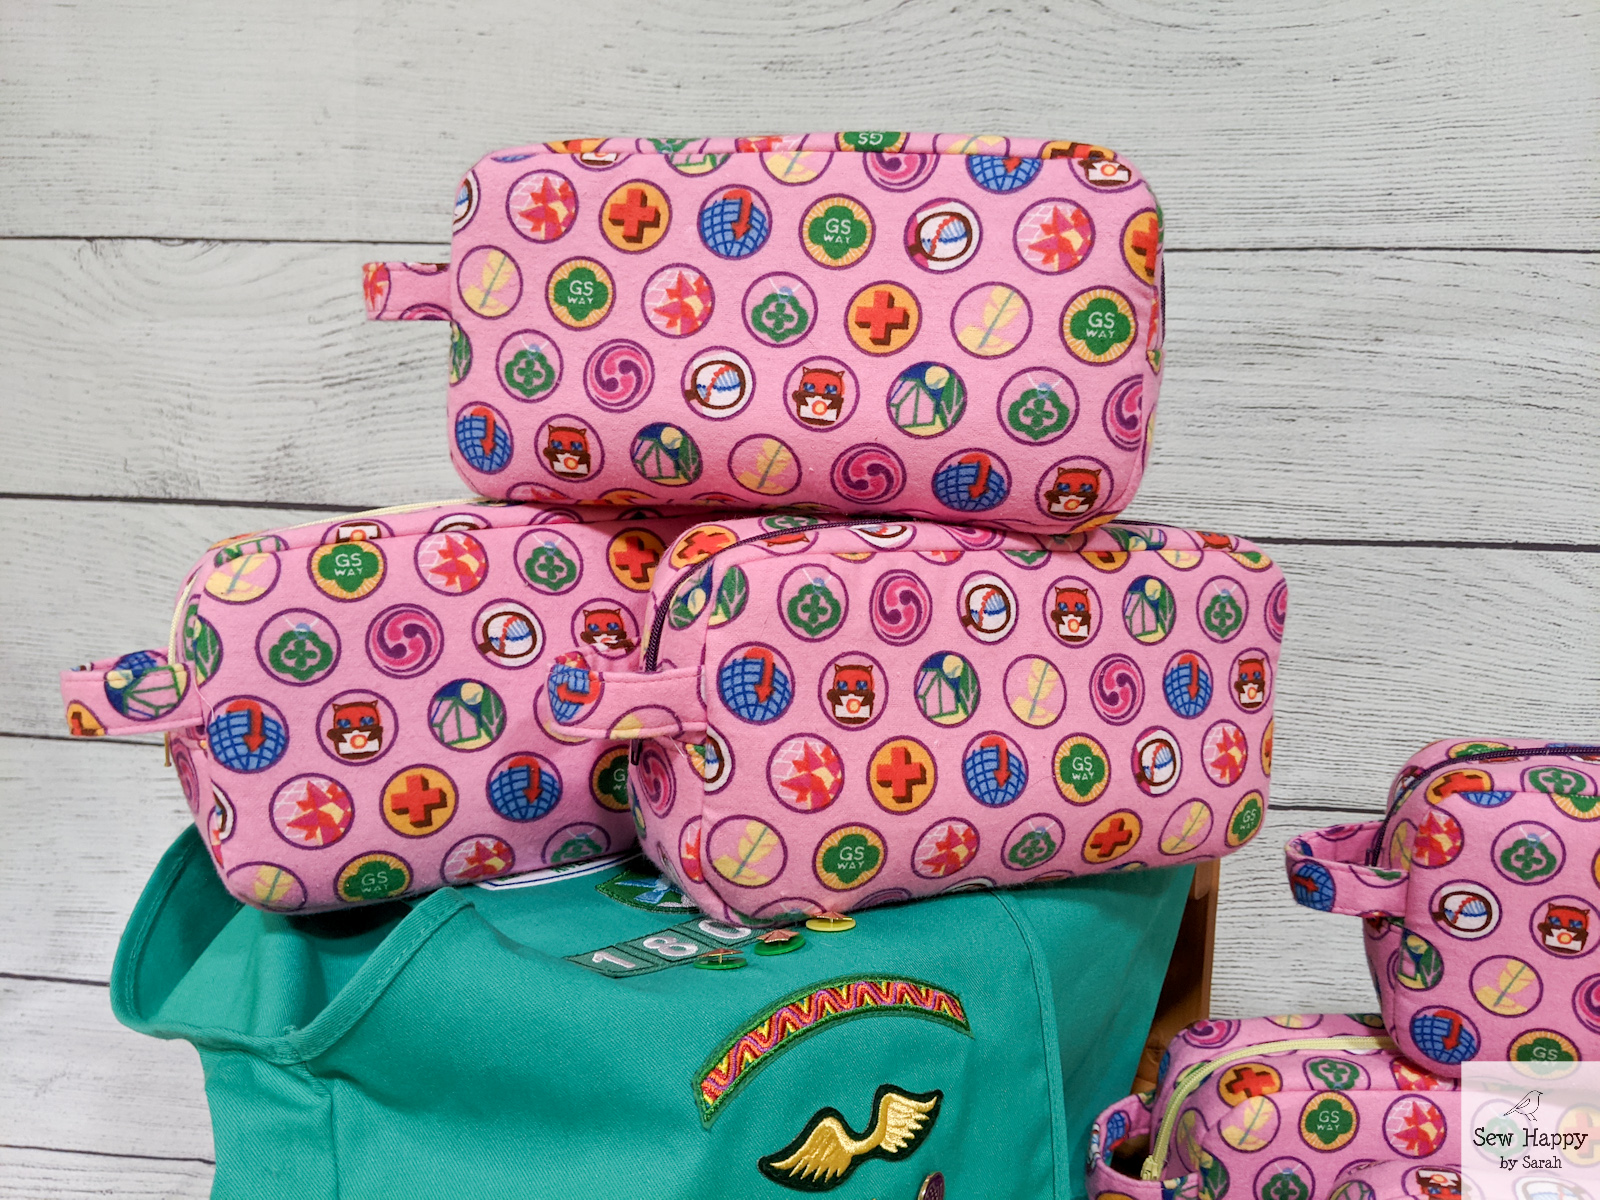
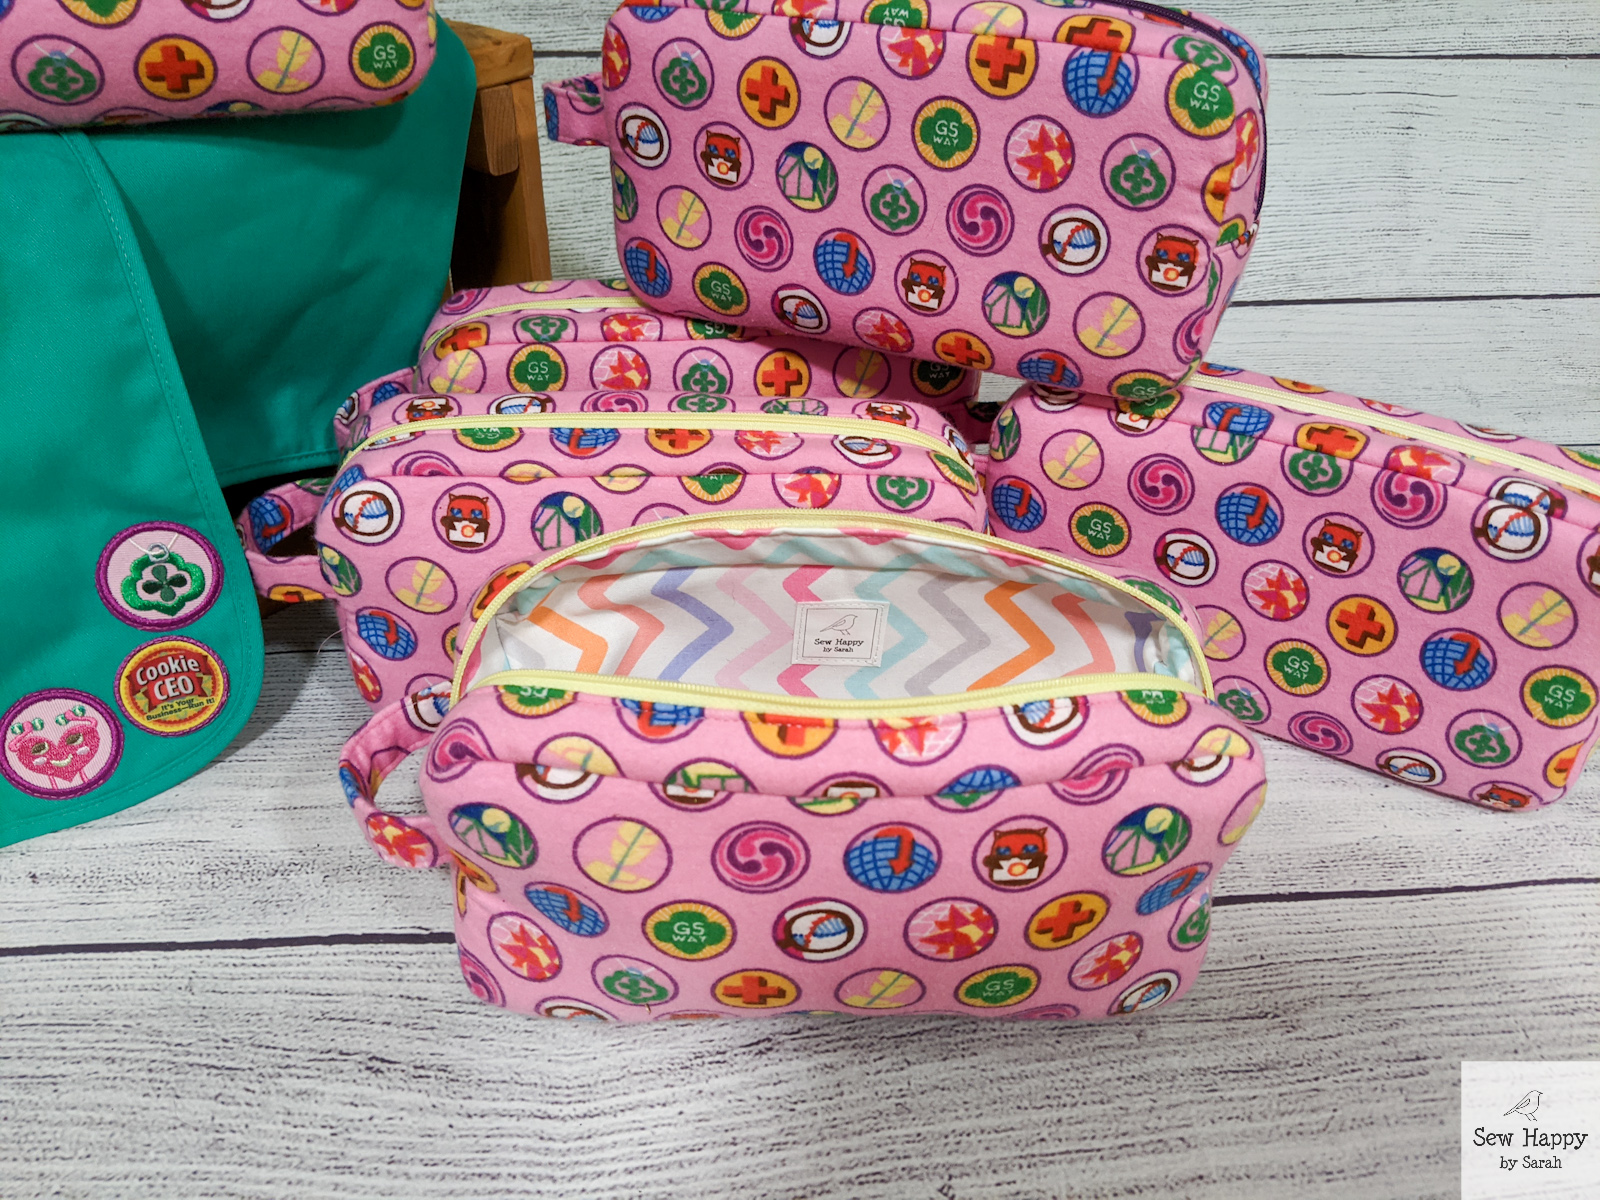
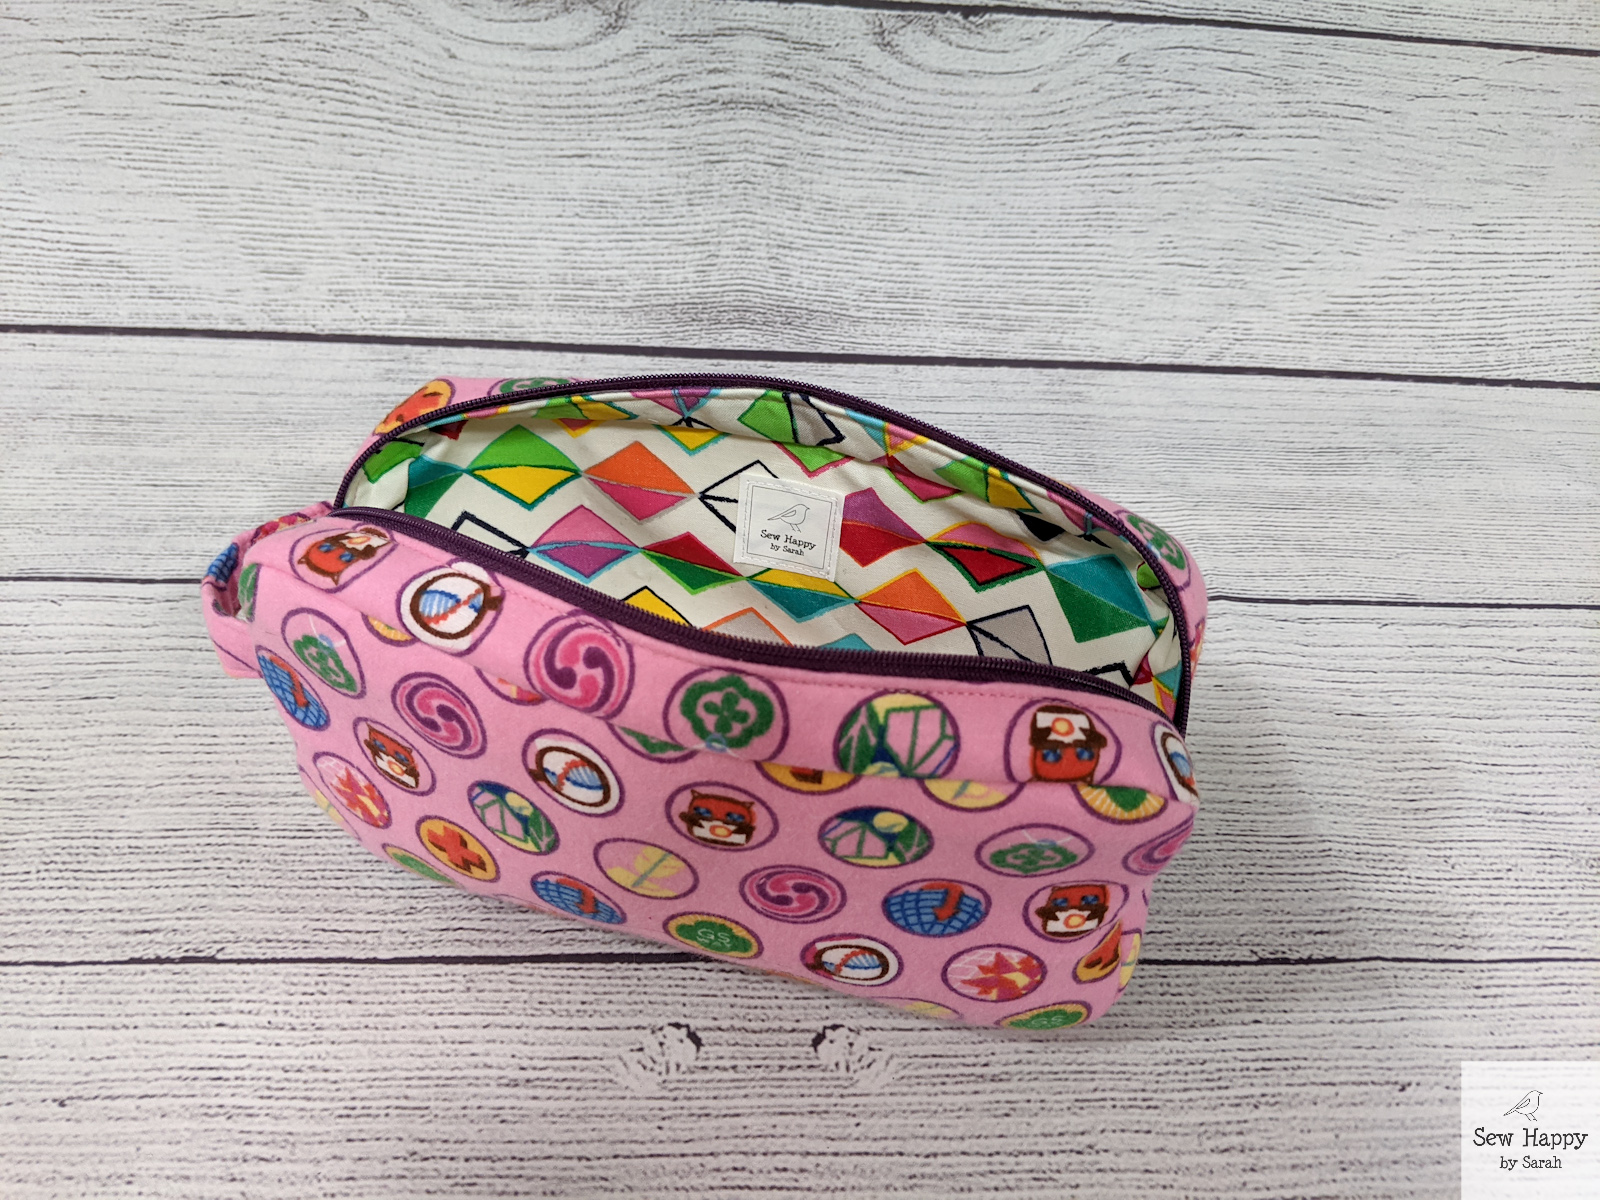
What better way to celebrate my birthday than by completing eight Moto pouches! Yes, today is my big day and I finished up the last of these pouches for my Girl Scout troop. Well, seven are for them and one is for me to hold my troop leader gear! I started leading my daughter’s troop this year and with all the virtual Zoom meetings we had to endure due to the pandemic, the girls deserve a fun end-of-the-year gift.
When set out to start this project I already had all the supplies I needed. I had found this Junior badges fabric at Joann’s in the clearance section for 80% off awhile ago. I didn’t know what I’d do with it at the time, but the price was right so I grabbed a few yards! It’s flannel but works surprisingly well for a pouch. I also used two different lining fabrics and zippers from my stash.
This was a fairly quick make thanks to the great pattern instructions and follow-along video from Sew Sweetness. I made these assembly line style, which I feel is the most efficient way to go when you want to make a lot of the same thing!
I experimented a bit by applying OdiCoat Waterproof Gel to the lining fabrics. This way the bags can easily be wiped clean if the girls put toiletries or something messy inside them. This was my first time using OdiCoat and I was very impressed with it! You can feel that the lining has a different texture. I’ll definitely use it again.
I wanted to add a little something extra to the pouches and found these Pop-It toy keychains. Fidget toys are all the rage right now with these girls, so I know they’ll be excited for this bonus gift. These will be fun zipper pulls for the bags.
Finished Size: Large - 9-1/2” long x 5” tall x 2-1/2” wide
Pattern: Moto pouch from the Minikins Season One Bundle by Sew Sweetness
Fabric: Girl Scouts Junior Badges flannel from Joann Fabrics
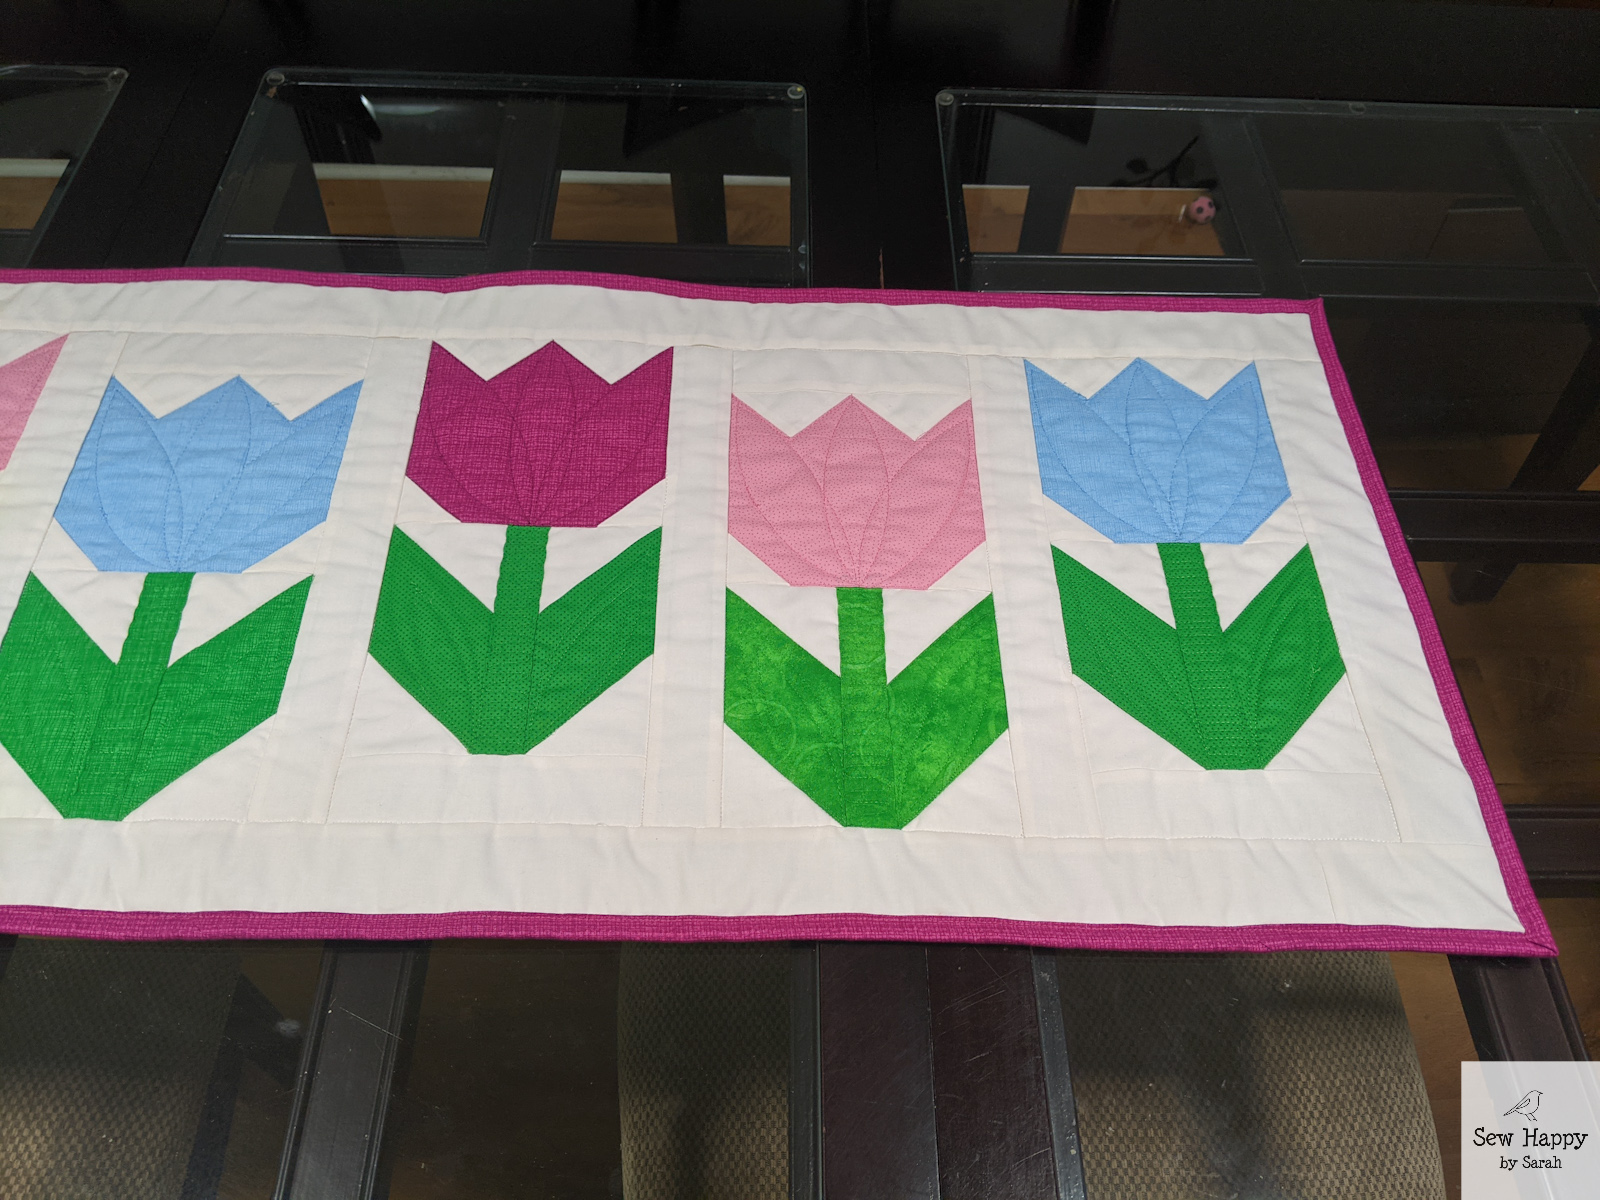
The last of my spring tulip projects is complete! When I saw this Easter Tulips table runner pattern and fabric kit at a quilt shop, I couldn’t resist. I like the modern style and colors. While I was making this runner, I also made extra tulips and turned them into pillow covers and a wall hanging. It was a great way to work on multiple projects at once!
This runner turned out a bit wider than I was expecting. I almost feel like it’s too big for my table and it would be better as a wall hanging. I might add a hanging sleeve to the back and hang it up next year, but it certainly gives a nice pop of color on my table for now!
I quilted this on my longarm using a curved ruler to mimic petal and leaf shapes. I’m still getting the hang of the machine and fighting a bit with getting the thread tension settings just right but it’s going better each project I quilt!
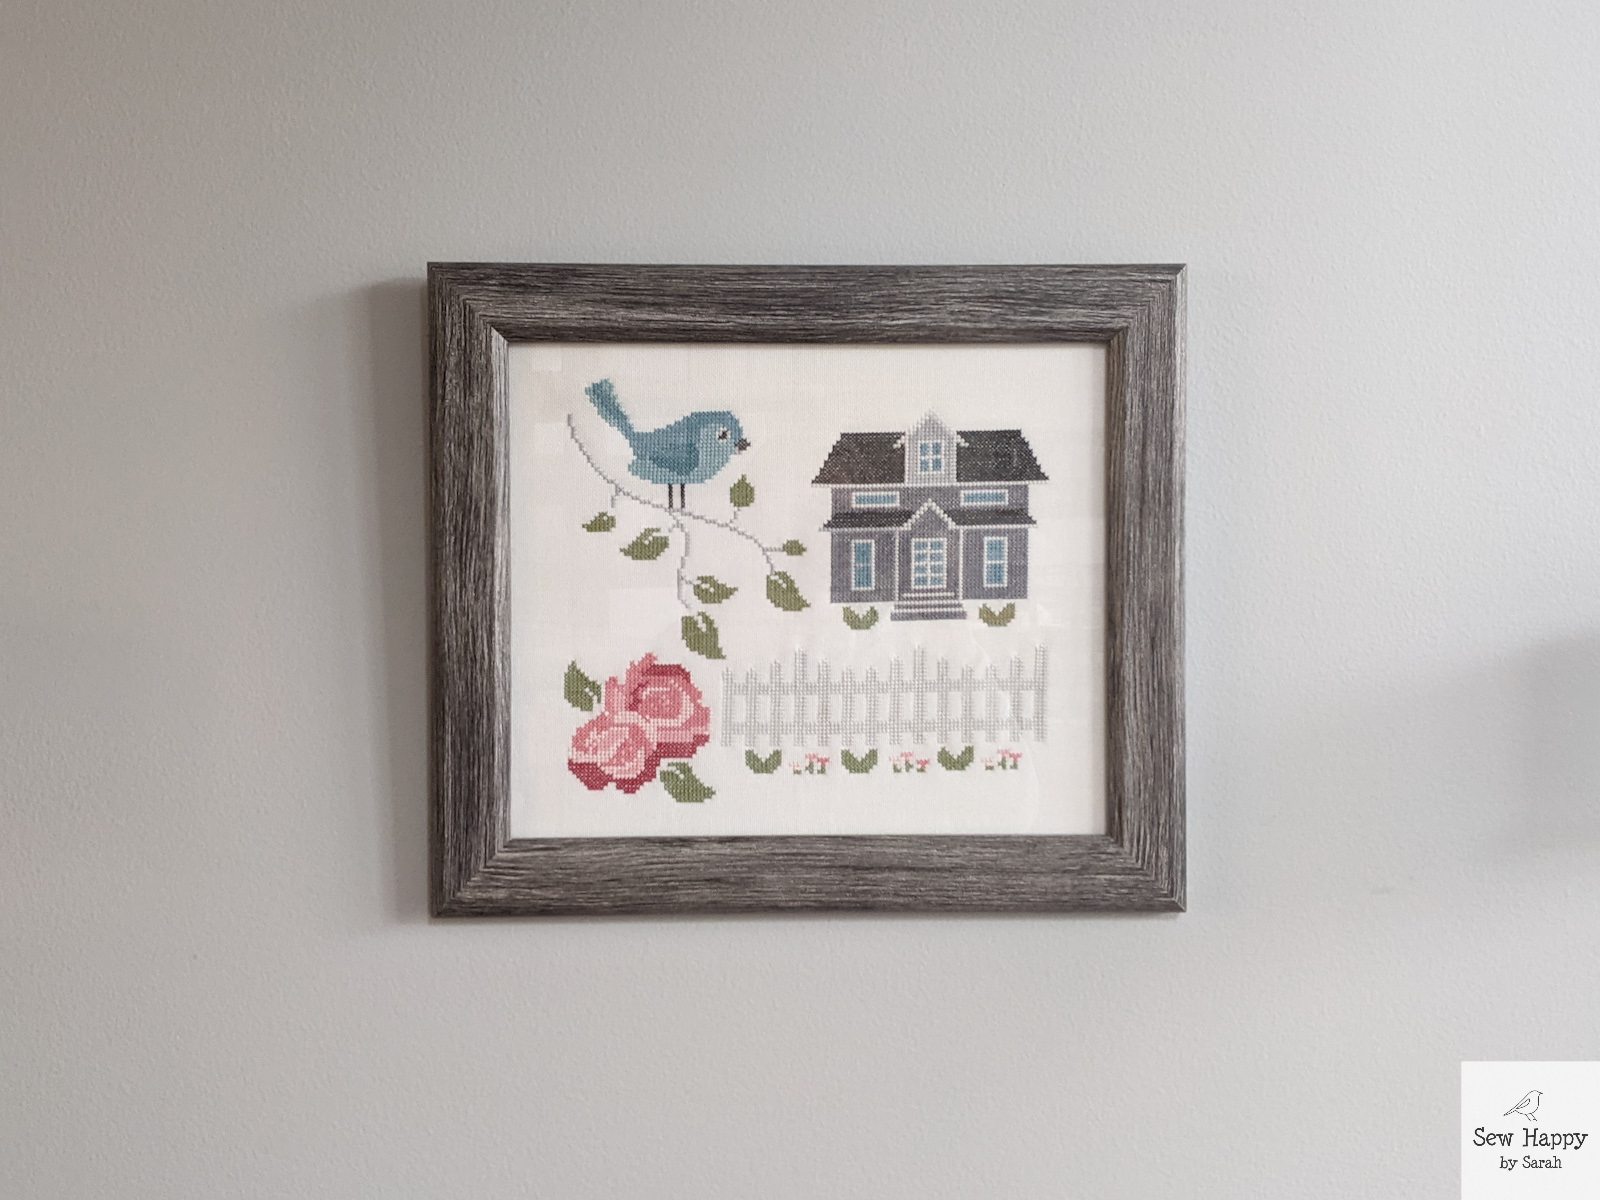
When I saw the blue bird in the Feels Like Home cross stitch pattern, I knew I had to stitch it! I am a bird lover and coincidently my house is gray so this piece was just my style!
This was pattern was actually a mystery stitch-along where a new section of the piece was revealed each week during May 2020, but I didn’t end up starting it until this year when it was no longer a mystery. Good thing, because I decided to make some modifications to the original design.
The original included the text “Feels Like Home” under the house. I don’t really like words on my decor, so skipped it and moved the flower and fence up higher below the house. At that point it looked like it still needed something else. Some green bushes copied from above and some little flowers I created did the trick!
Note: Some product links contained on my site are affiliate links. I earn a small amount if you purchase the item, at no additional cost to you. The products are first and foremost honest recommendations from myself and if you find the recommendations helpful I am thankful if you use my links!
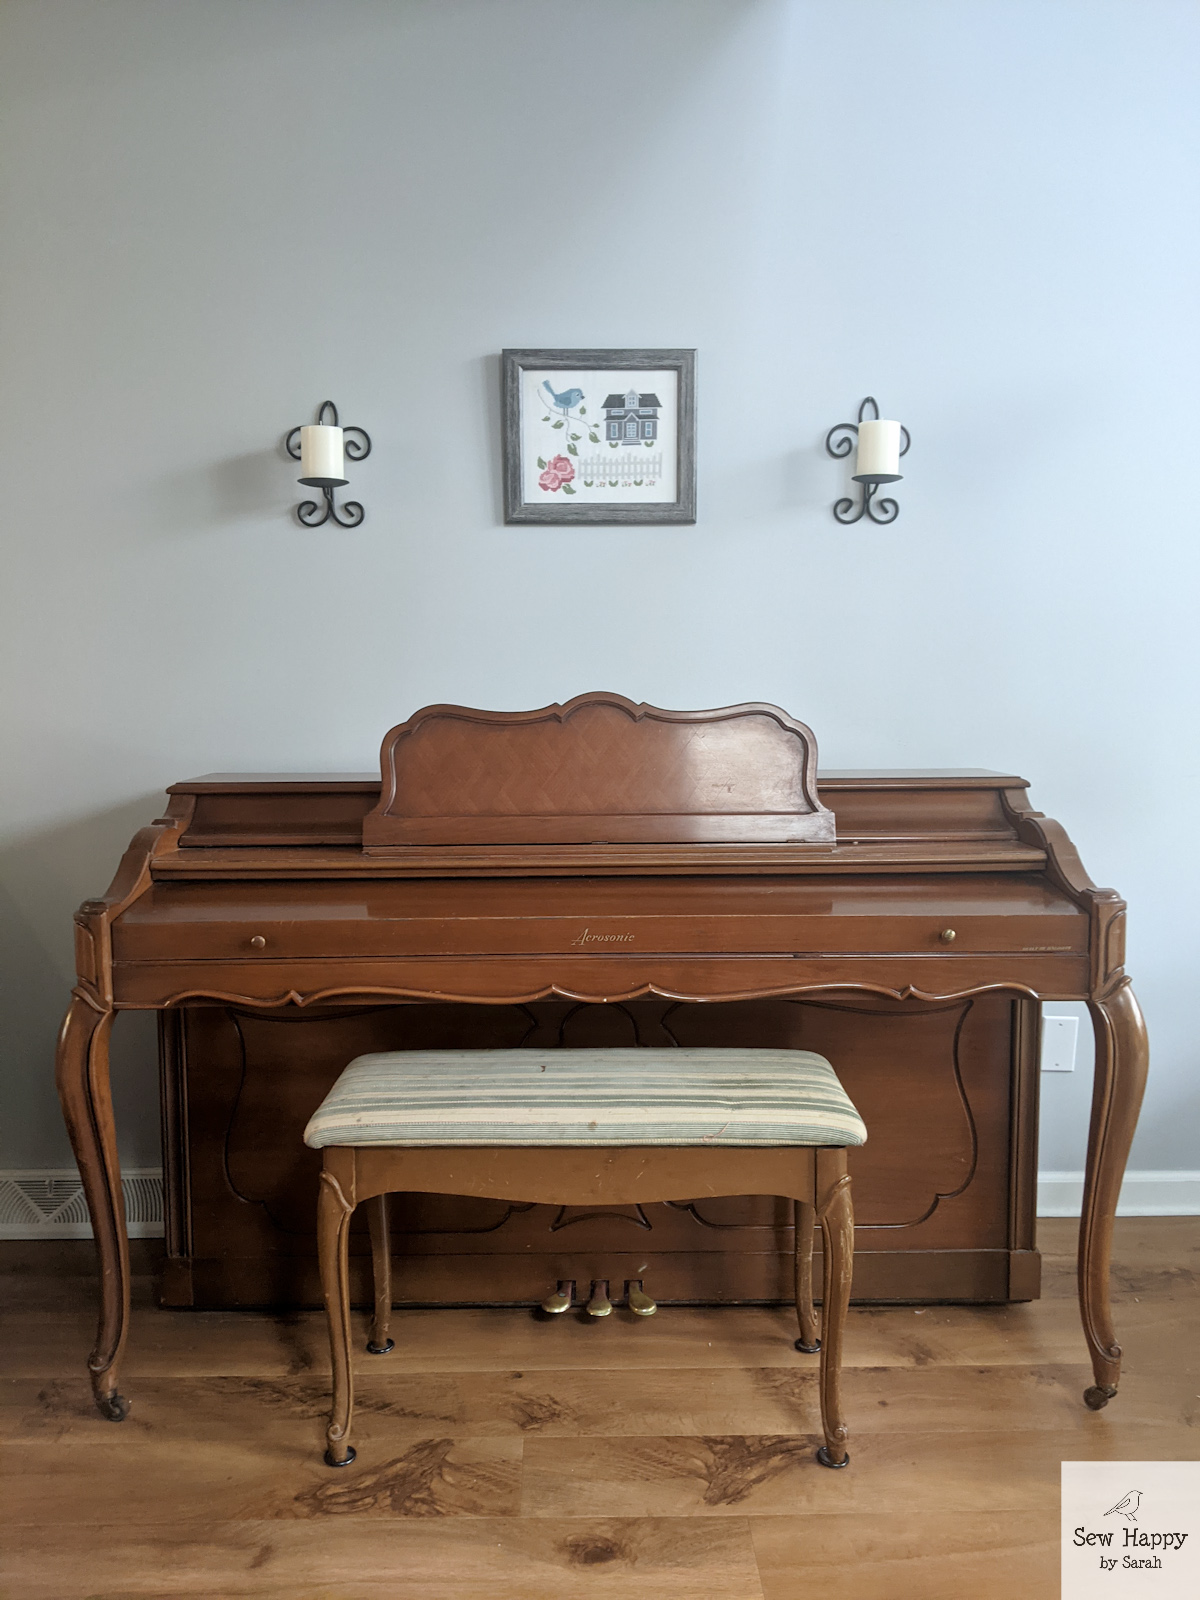
I used the suggested Cloud 25 Count Lugana cloth and stitched over 2 with called for DMC from the thread pack offered by Fat Quarter Shop. With the modifications I made, the finished size of my piece was 9.5″ x 8.25″. It was a bit too wide to fit in a 10″ x 10″ square frame and have enough white space around it, so I searched Amazon and found the Craig Frames Arthur Picture Frame, 10 x 12 Inch, Gray Barnwood. The style, color and size of the frame worked out perfectly! I’m so happy with it!
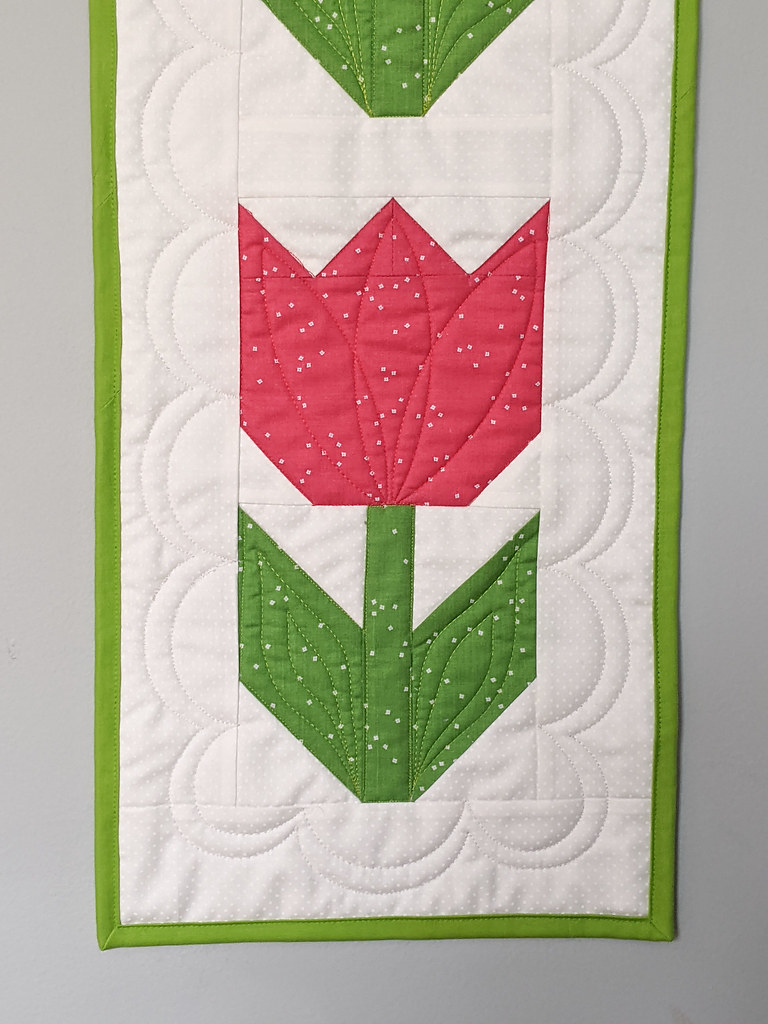
As I was gathering ideas for Spring decor projects, I remembered this Tulip Twist pattern and fabric kit I had purchased at Front Porch Quilt Shop two years ago. I pulled it out and made it along with my other recent tulip projects. I love the movement this piece creates! Both with the turning flowers and the dancing border.
The border was perhaps the most time-consuming part of this project. It involved making strip sets of each color of fabric sewn to a white strip and then cutting those down into 1.5″ pieces. (Small!) What took up the most time was sewing all those 1.5″ pieces together. The finished product was worth it though!
I took the opportunity to play around with the quilting, trying different designs in each flower. I used some of my rulers and a bit of freehand.
Close ups of the quilting
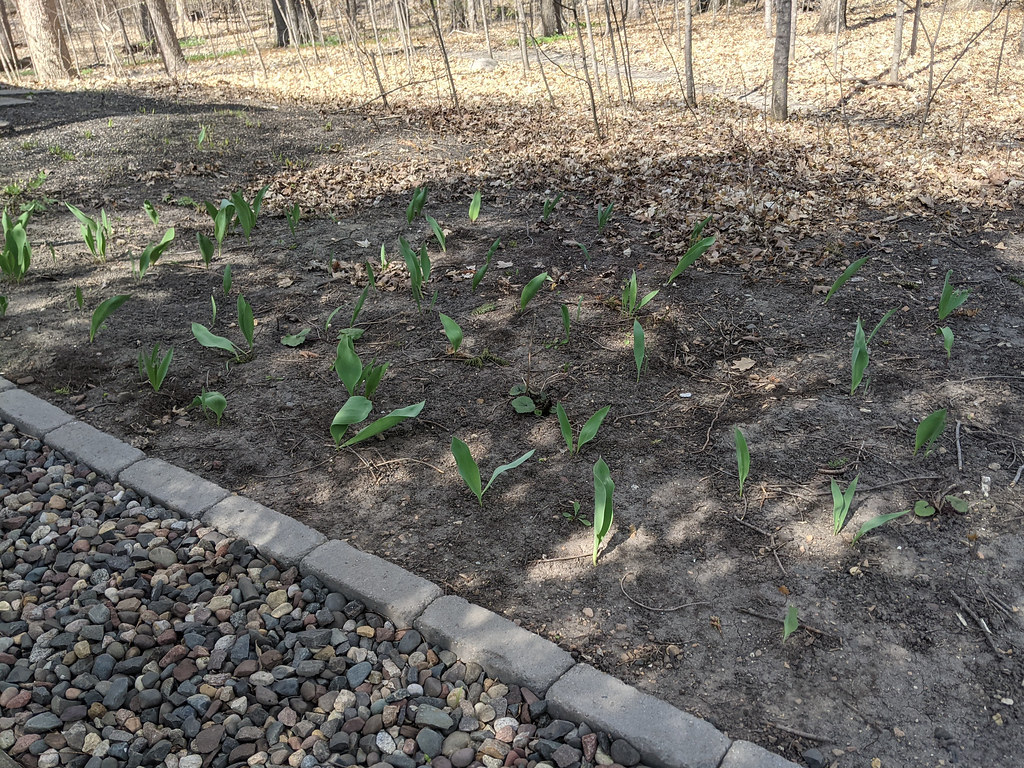
Ironically my real tulip garden outside looks like it’s not going to bloom this year, but at least I’ll have these cute flowers inside!
Finished Size: 32" x 32"
Pattern:Tulip Twist by Front Porch Quilts
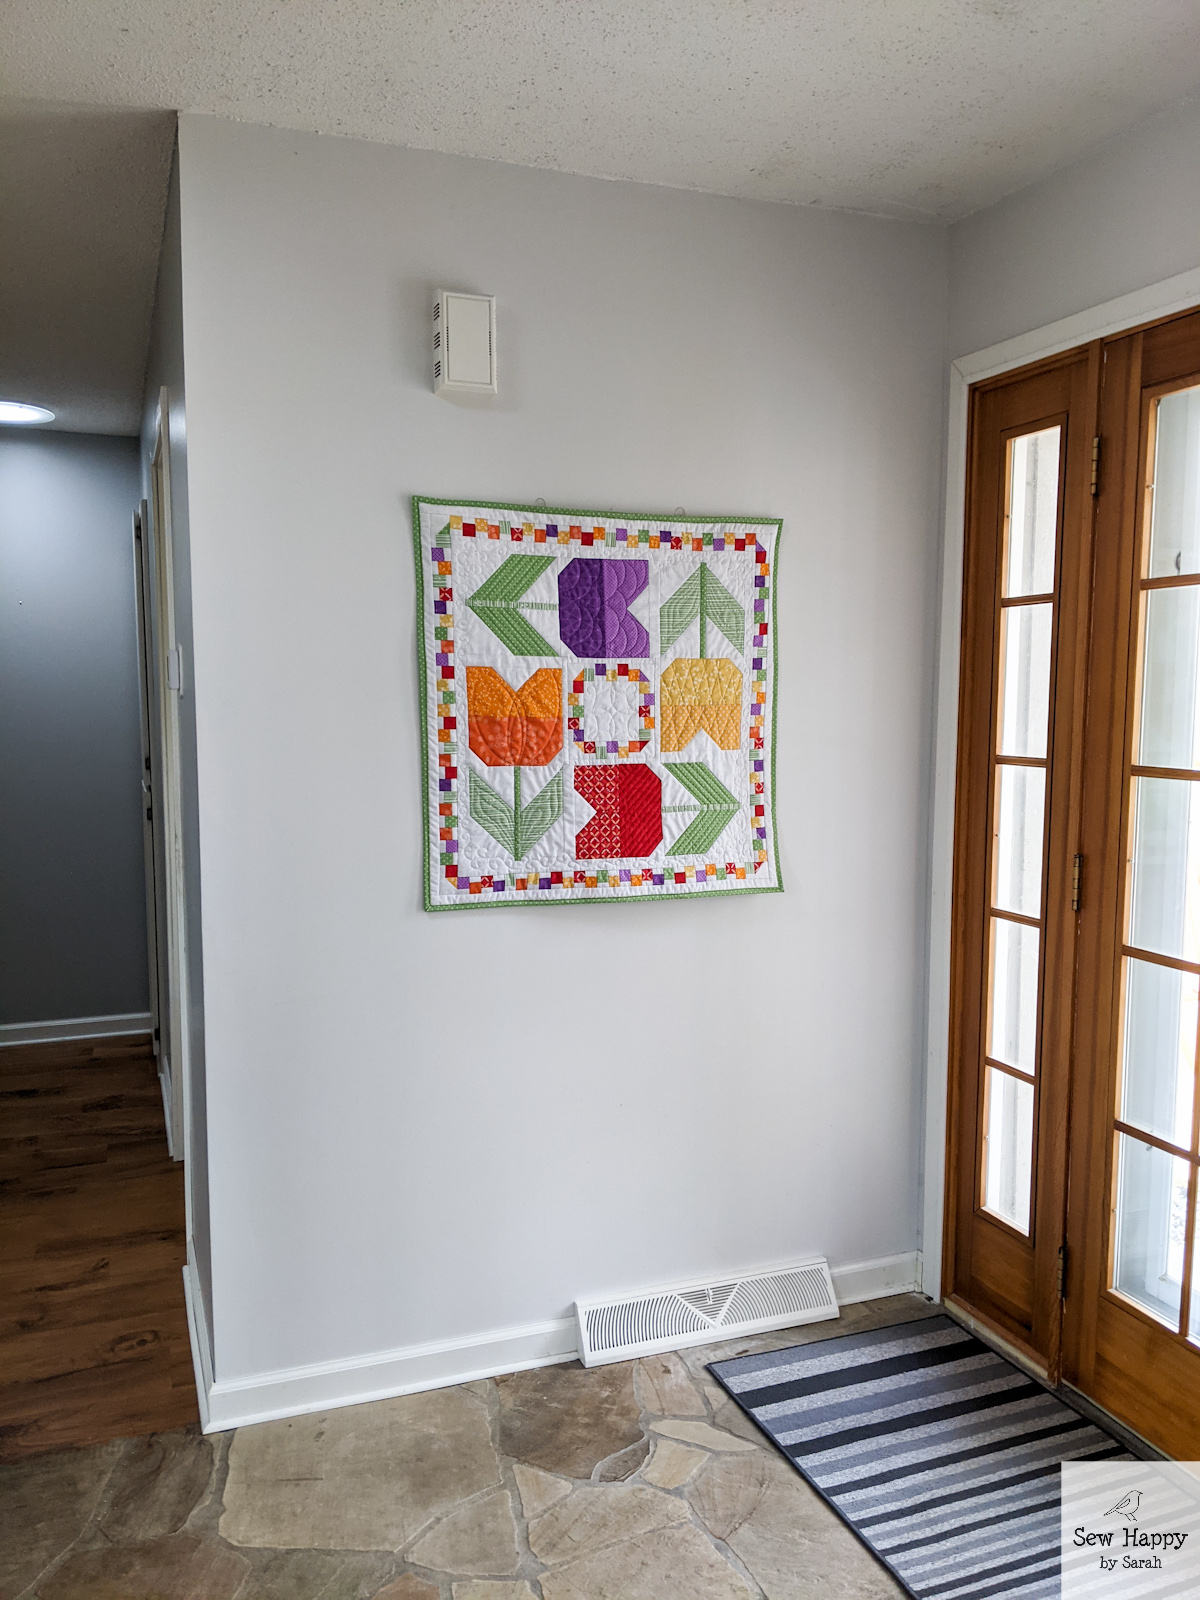
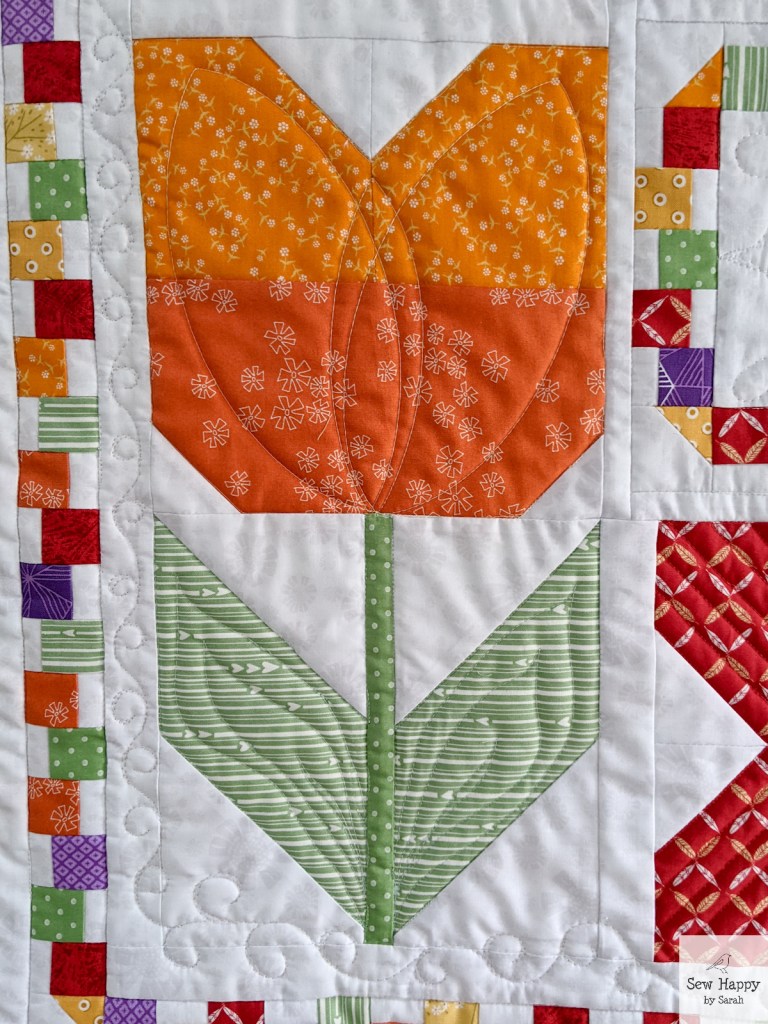
My mom was in need of another wall hanging so she could change out the winter one I made her last year. As I was making the Easter Tulips Pillows and a corresponding table runner that isn’t quite finished yet, I took some extra tulip blocks and quickly made this wall hanging!
I added the white border around the blocks to create the desired width and length, then I threw it on the longarm! Small projects like this are a great way to practice quilting designs. I’m still learning and they say the more you quilt, the better you’ll become. I played around with some rulers and did freehand on the leaves. I’m feeling a little more confident in using the machine now!
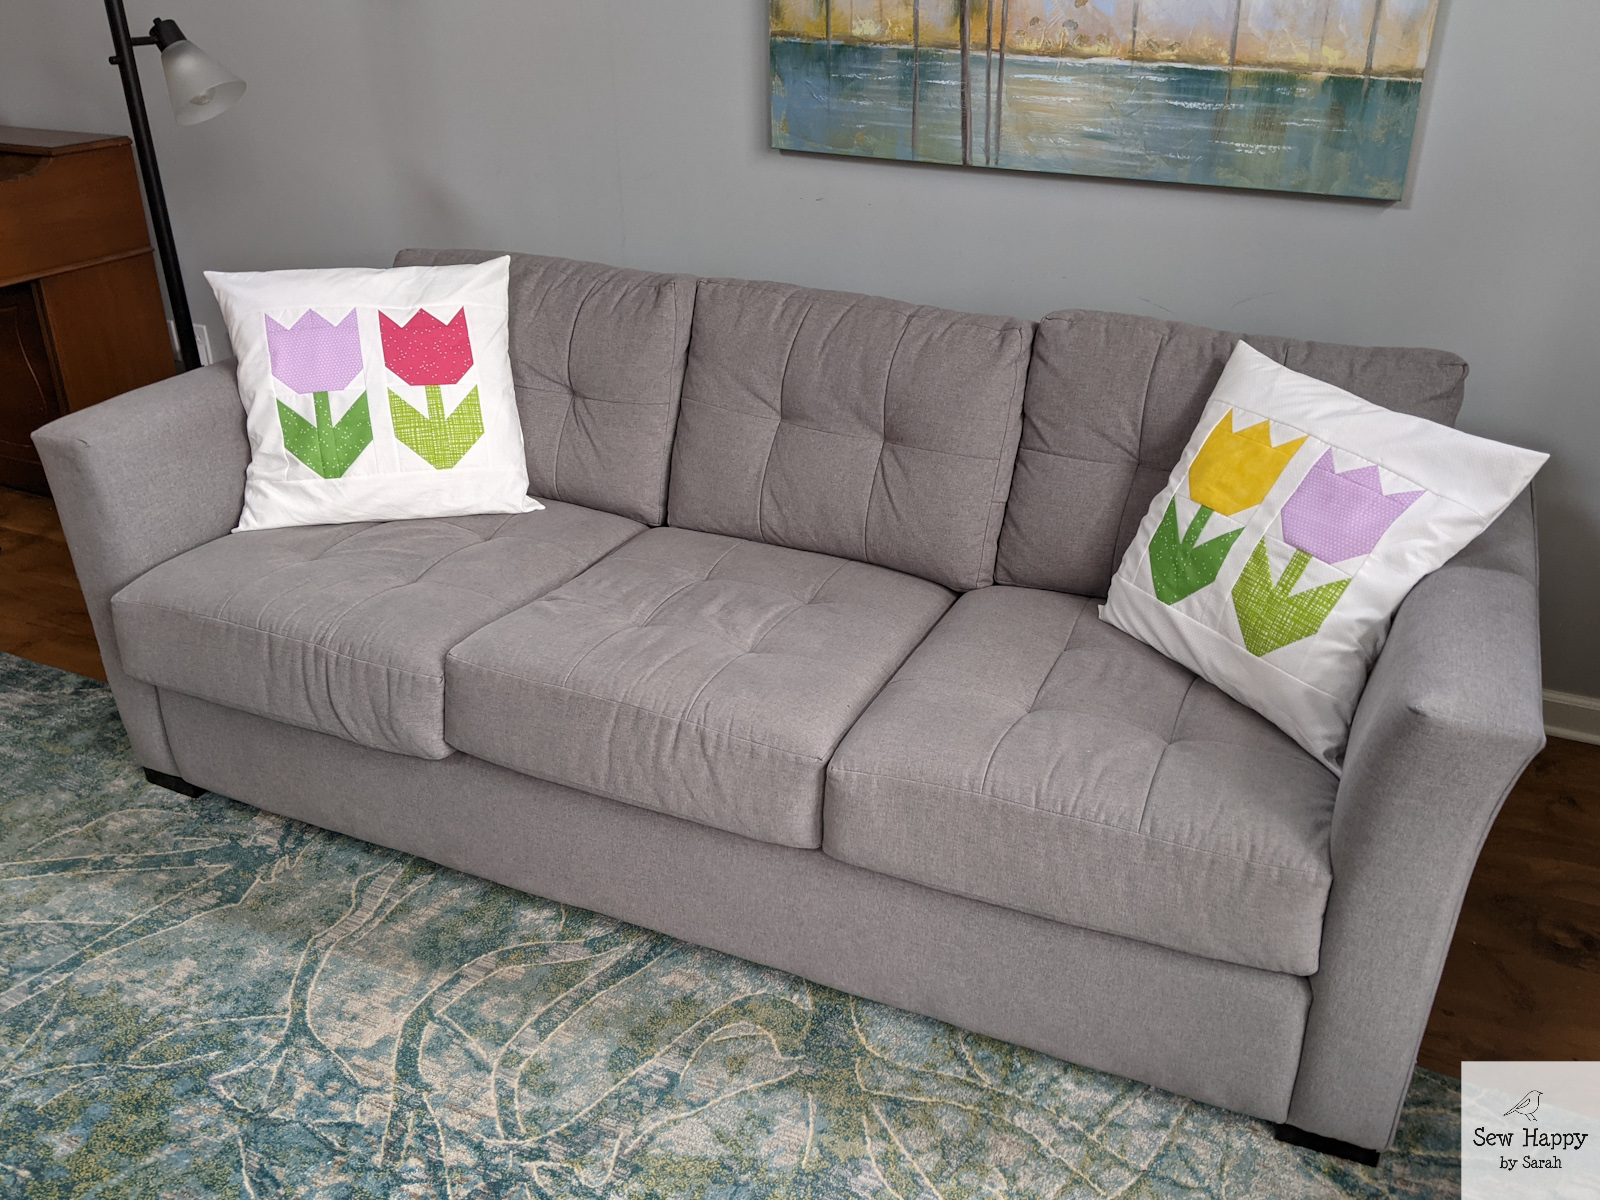
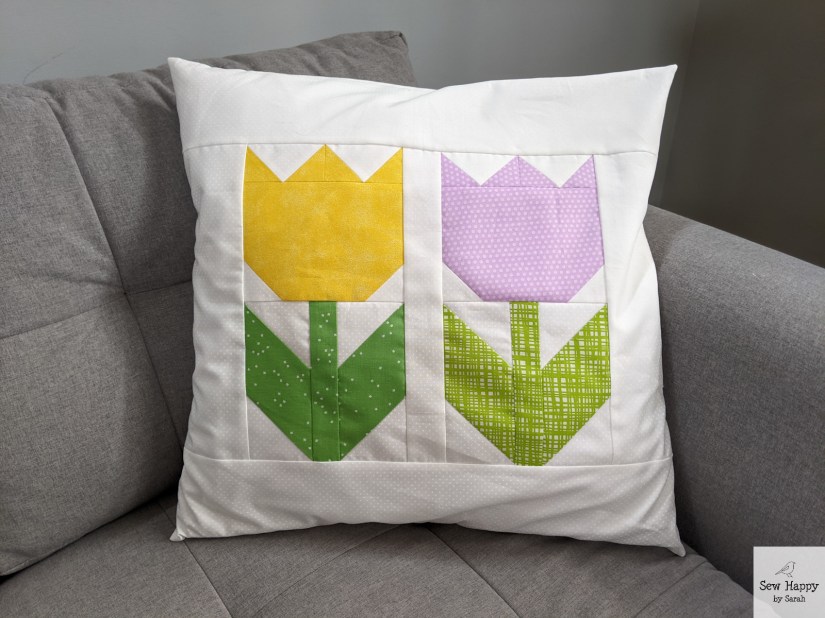
I’ve been busy sewing all things Spring lately — and in particular tulips! While working on a bright, happy tulip table runner called “Easter Tulips” by Cluck Cluck Sew, I got the idea to make extra tulips for pillow covers for my couch. These were so fast and easy to make that I finished them before the table runner!
The Easter Tulips pattern can be found in the Modern Holiday Table Runners pattern booklet. I followed the pattern for the tulip blocks, added a spacer between them and did the math to figure out the size of the white borders needed to create the 21-inch-square pillow covers. I made an envelope back to slip over my pillow forms. The tulip blocks went together quickly and I can’t wait to make more of the seasonal table runners in the booklet! I might have to convert more of them to matching pillow covers, too!
Walking into my living room is so bright and cheery now! What a fun project to use my fabric scraps.
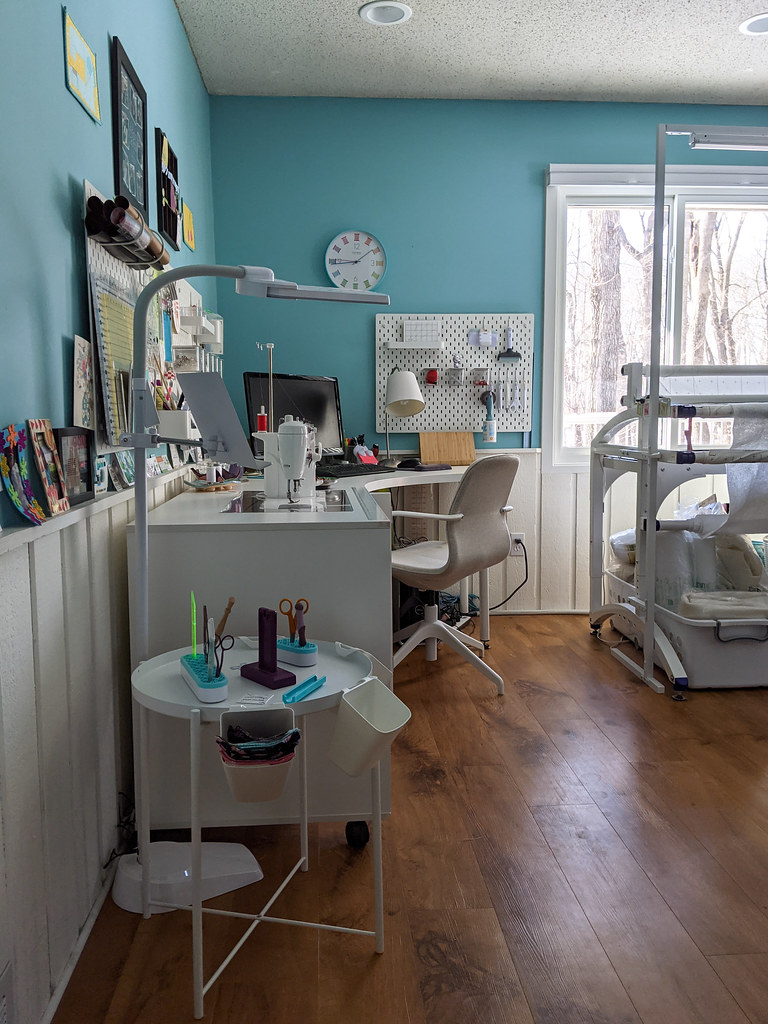
Welcome to my sewing room! This 11-foot x 14-foot space is obviously my favorite room of the house! It started as an office and as my love of sewing grew over the years, my sewing supplies took over the whole room. 🙂 Let me show you the different areas of my room, how I organize them and what products I use. I’ve included a lot of details because I know how inspiring and helpful it is to see how someone else organizes their room!
Entrance to my sewing roomRoom layout
My layout has changed over the years (most recently when I brought the longarm in last year) but the way it is currently set up is working well. You’ll see I use every inch of space available!
Note:Some product links contained on my site are affiliate links. I earn a small amount if you purchase the item, at no additional cost to you. The products are first and foremost honest recommendations from myself and if you find the recommendations helpful I am thankful if you use my links!
Sewing & Computer Area
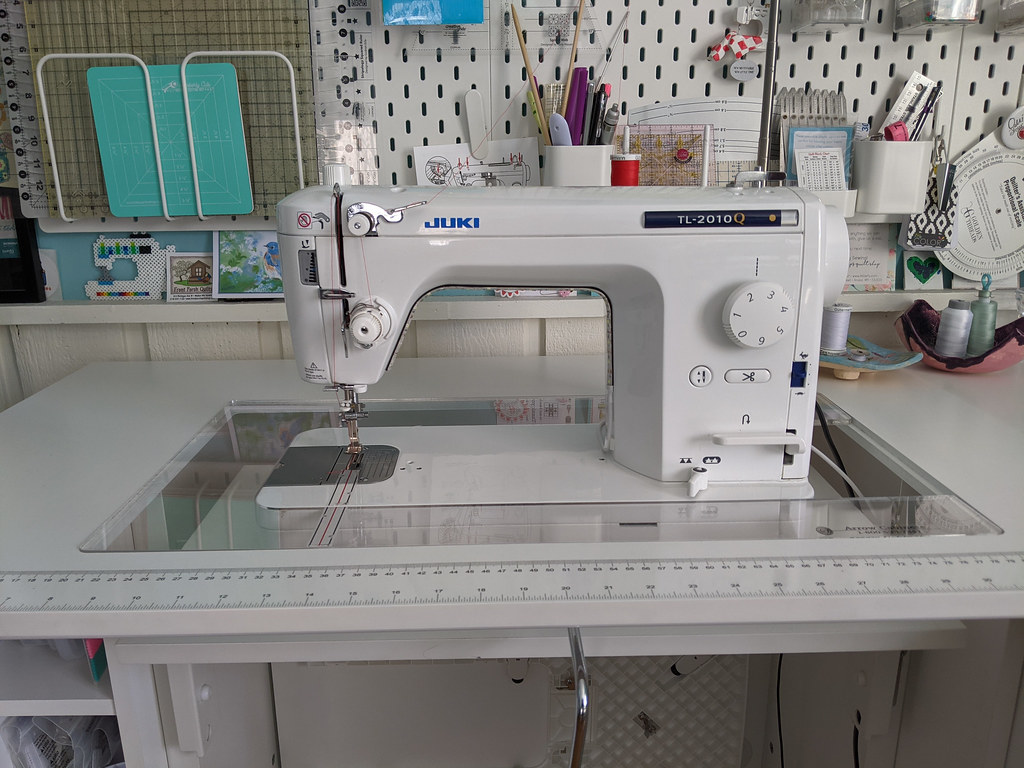
The first area you see when you walk in the room is my Juki sewing station and computer desk. The Juki TL-2010Q is my main machine which I use for quilt piecing, bag making, and free-motion quilting. It’s a very popular machine in the quilting and bag-making worlds! I’ve owned it for three years and have loved it from day one! This semi-industrial machine is fast and can plow through as many layers as I throw at it.
The floor lamp next to the sewing desk is the OttLite Dual Shade LED Floor Lamp. It has a handy stand to rest my pattern books or it could be used as a tablet holder with its USB charging outlet.
Juki sewing desk
The desk my Juki sits in is an Arrow Mod Squad Model 2011 Modular Sewing Cabinet. I researched many desks before purchasing this one and chose it because the table the machine sits on has a hydraulic lift to adjust it in three different positions: flat bed (pictured), free arm (bottom of machine is flush with the desk top so you can utilize the machine’s free arm) and storage (lowered to the floor inside the desk). It also has an option for a custom acrylic insert to make the machine flush with the table top for easier free-motion quilting (pictured). Arrow Cabinets has an entire line of “Mod Squad” cabinets that can be used together: Mod Squad System.
The desk is very sturdy, yet is easy to move around the room if needed since it is on wheels. When the machine table is lowered to the floor for storage, you can put the included white wood insert over the opening to use the desk for another purpose, making it very versatile. The desk also has a door that can be pulled closed when not in use. When open, the door tucks into the right side of the desk (pictured). The majority of the time mine is open!
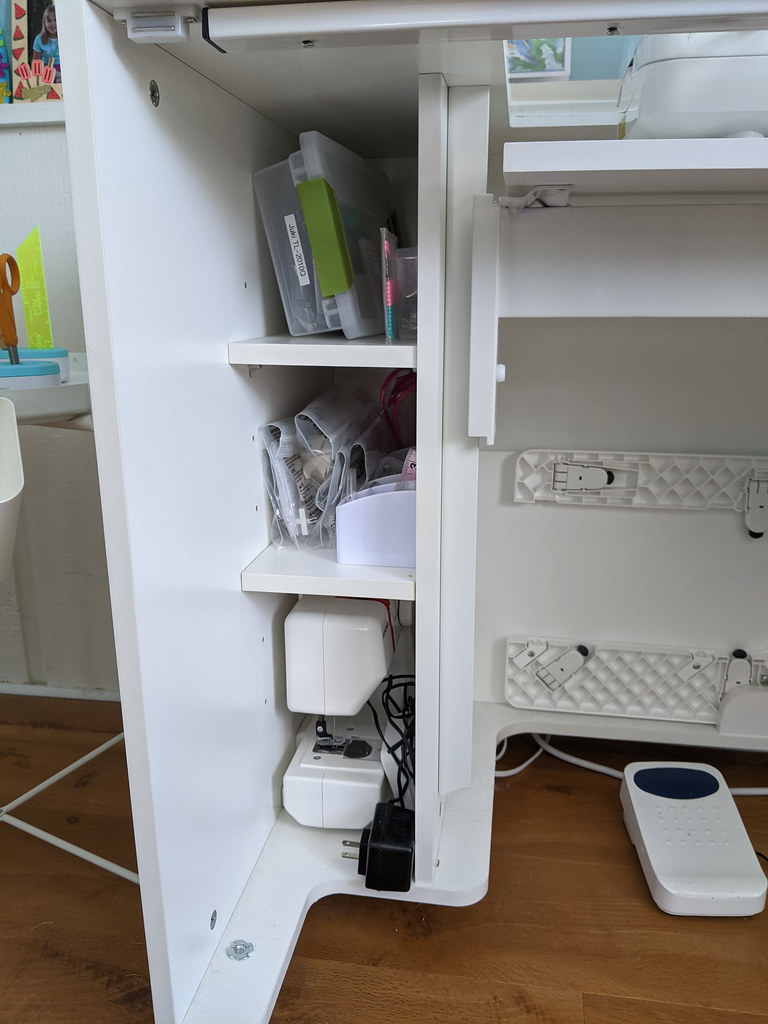
Shelves inside the desk
The storage shelves in the desk are just the right size to hold my sewing machine supplies and a mini machine for my daughter. I have a Sterilite Small Clip Box for each of my machines (shown on the top shelf) which contains all the tools that came with the machine and the feet. The box fits great on the top shelf and is easy to grab and take with to retreats without having to worry if I forgot anything!
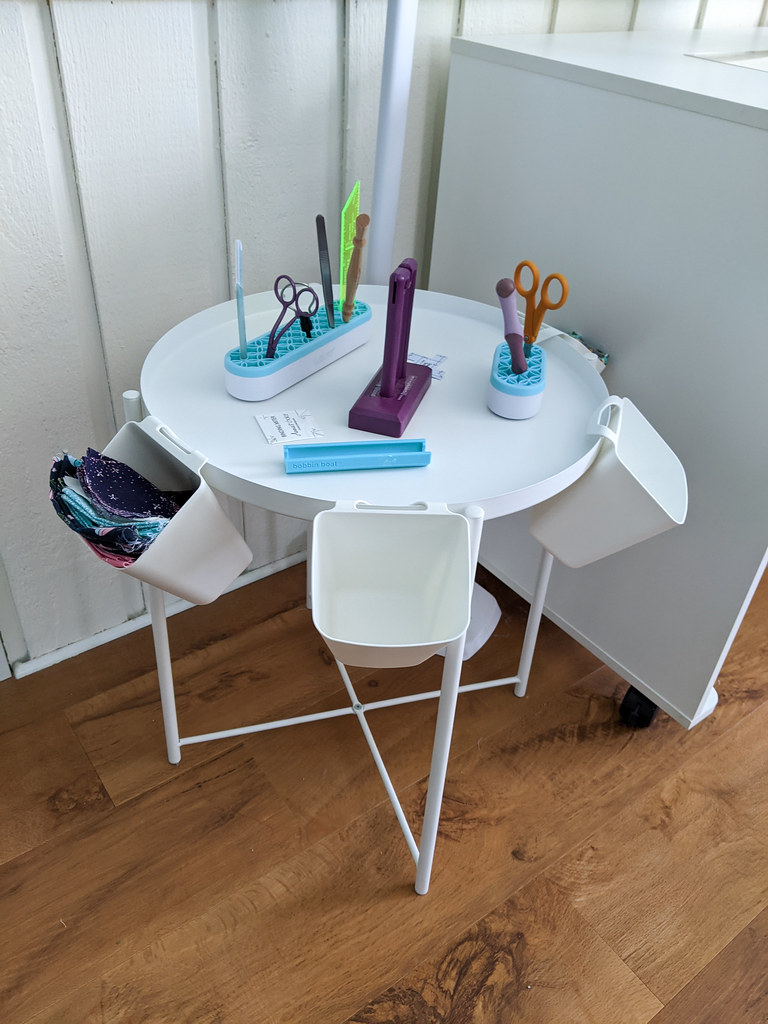
I have a handy Ikea Gladom Tray Table next to my machine with all the supplies I need close at hand while sewing. I pull the table right next to me when I’m sewing. I hooked Ikea SUNNERSTA containers on the rim of the table to hold my starter fabric scraps for chain piecing and I also use a couple as convenient trash cans for my thread clippings.
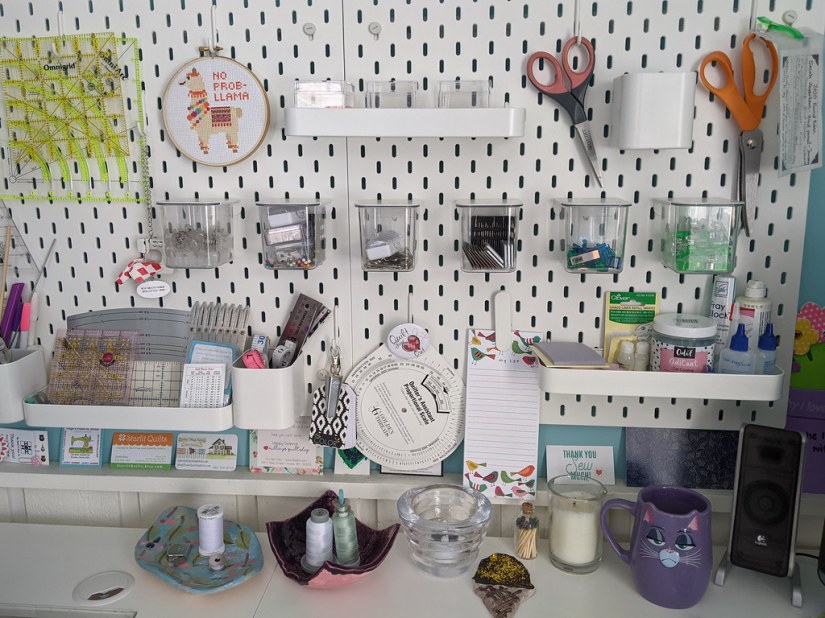
Above the desks are peg boards filled with all of my miscellaneous tools and small rulers. I chose to use the Ikea peg board system because I love all the accessories you can attach to it! There’s another peg board near my computer desk with supplies for my Cricut Maker cutting machine. I use it to cut fabric, which is a real time-saver!
The longarm fits in just perfectly into this space
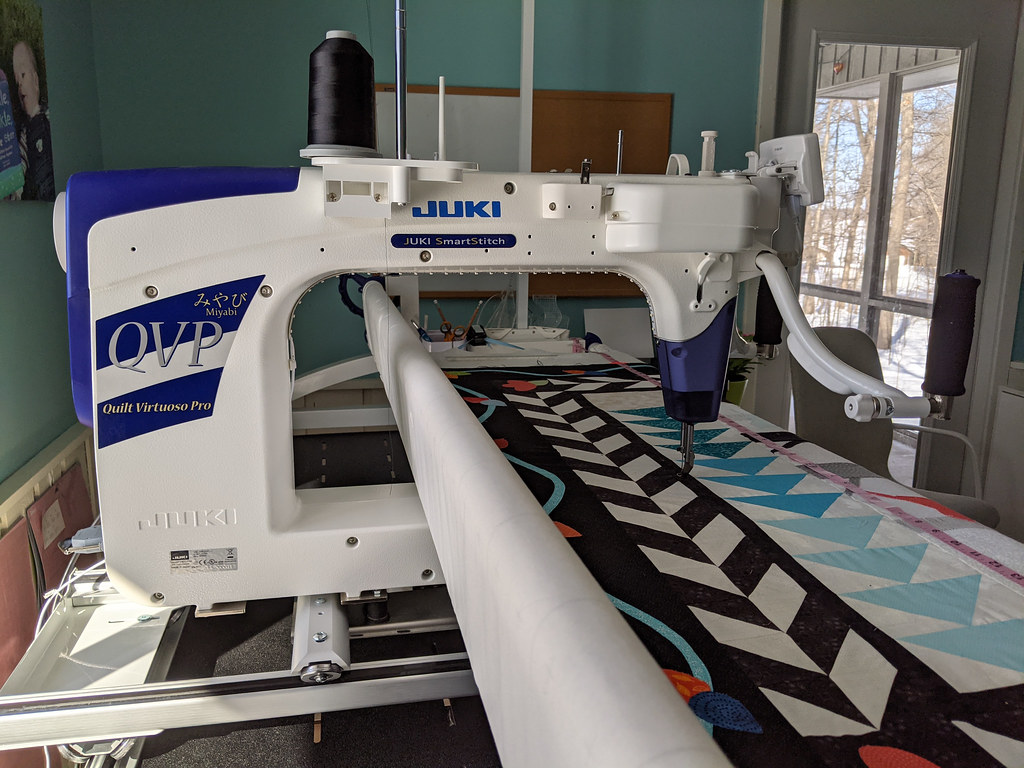
After finding a love of doing free-motion quilting and realizing wrestling a large quilt on my Juki sewing machine was getting tiring, I set out to buy a longarm. Already a big Juki fan, I chose the Juki Miyabi J-350QVP Longarm with an 18-inch throat space on a 7-foot table. Seven feet is definitely the largest frame I could fit with my current furniture configuration, but so far it’s been the perfect size for the throw-sized quilts, wall hangings, and table runners I make.
The DIY light bar above my longarm was made by my husband. He used aluminum poles, brackets, and LED strip lights from Menards. I was in charge of spray painting the poles white. 🙂 It provides awesome light for my late-night quilting!
Storing tools on the frame makes them easy to grab
I have found having tools within easy reach while quilting is very important. I’m always needing to snip a thread or (unfortunately) sometimes rip some stitching out. I put these tools along with some marking pencils in magnetic cups on both ends of the frame, utilizing the magnetic frame to my advantage. This called for getting duplicates of the tools so I can reach them from both sides, but it’s so much more convenient and helps me go faster!
The other smart storage solution I came up with is hanging good ol’ Ikea SUNNERSTA containers on the side of my frame. It has the perfect lip to do so! These cups are a perfect place to store my quilting rulers and keep them easy to grab!
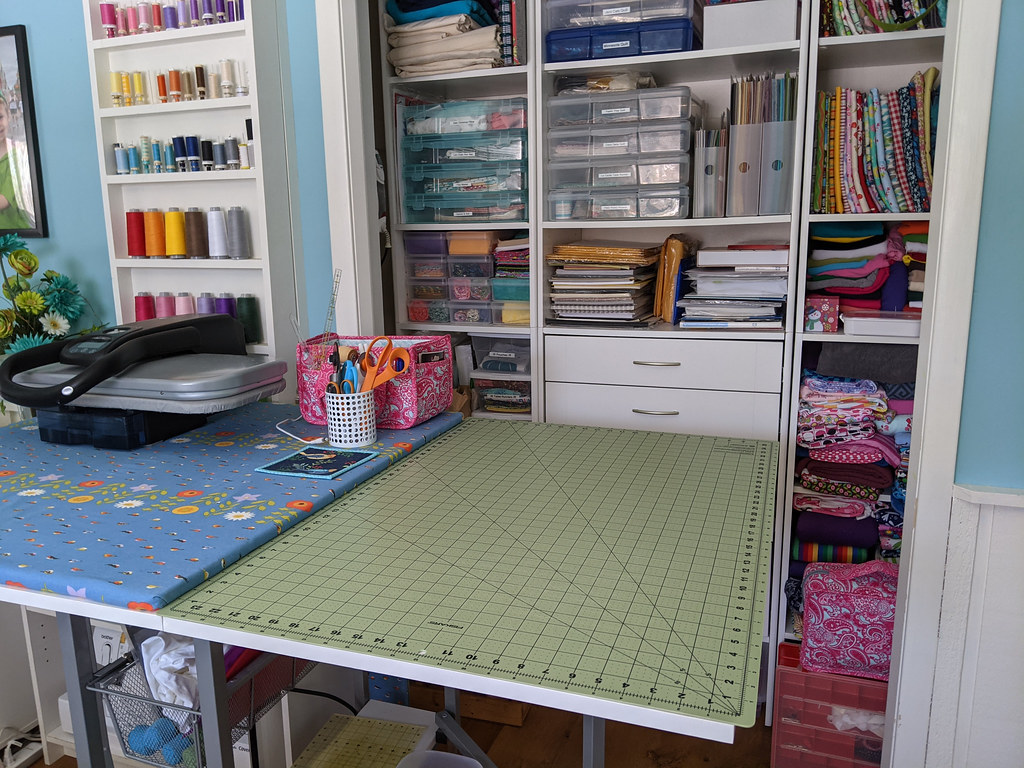
Standing height cutting and pressing table with comfy floor mat
My cutting and pressing table is located opposite of the longarm. When I first got the Studio Designs Sew Ready Hobby and Craft Table, I quickly realized how great it is to be able to cut and iron at a standing height. I previously was leaning down on a regular desk or on the floor! This table not only is height adjustable, but also has the ability to fold down each side of the table leaving a small center section to reduce its footprint. I have to admit my table is fully extended most of the time, but it is a nice feature if you are in a small space! I also love the bottom ruler storage shelf and sliding metal baskets for ironing supplies under the table.
The tan anti-fatigue standing mat in front of the table is a recent purchase and I’m not sure how I lived without it. I got an extra long Kangaroo Original Standing Mat (60″ x 20″) which conveniently spans the entire table length and also can cover most of the longarm length! I push it to whichever area I’m using and it really makes standing for long periods more comfortable!
One side for ironing, one side for cutting
I have designated an ironing and cutting side to the table, but at times if I have something large to cut out I can remove the ironing board to add a second 24″ x 36″ cutting mat. My ironing board is a DIY creation using plywood covered with batting and a decorator-weight fabric. The best way for a custom-sized ironing surface!
The iron I use is a Panasonic NI-WL600 Cordless Iron. Using a cordless iron is a dream in a tight space! No cord to fight with! When I need to fuse big pieces of interfacing for a bag or press quilt blocks flat, I pull out my Singer 26″ Intelligent Steam Press which sits on top of the table for lack of a better location. This is another dream machine. It really cuts down on my ironing time and provides a much better fuse/press than a regular-sized iron!
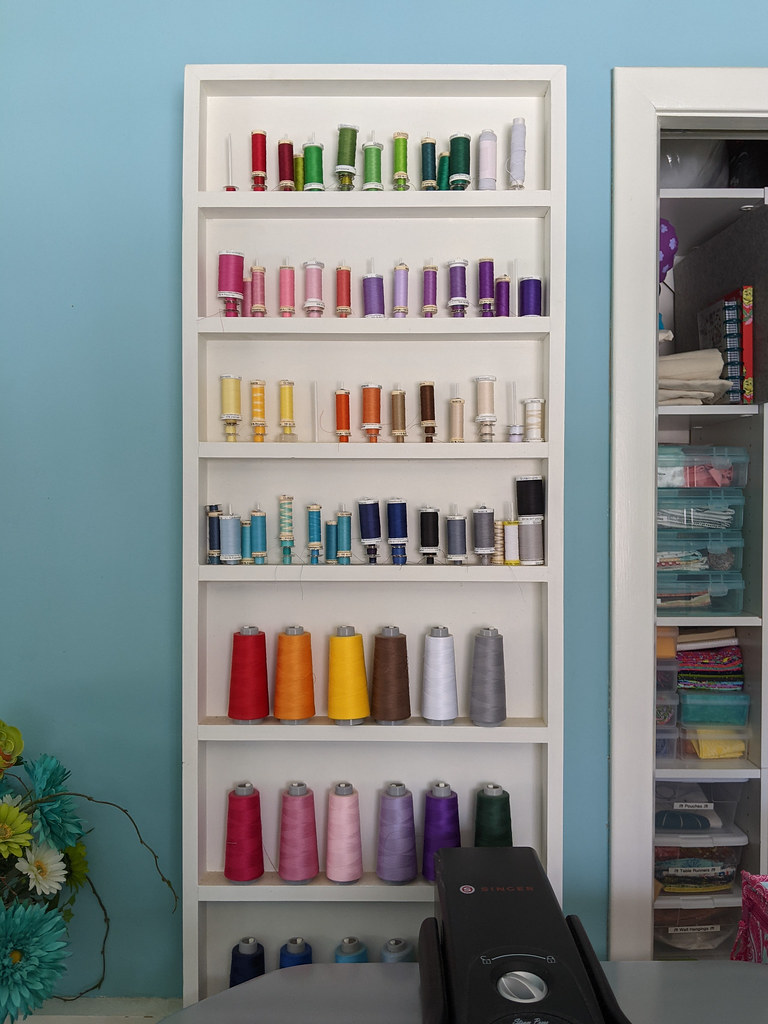
My DIY thread wall shelf hides a drop-down ironing board!
You’ll also see I have another ironing board hidden behind my thread shelves on the wall! This DIY solution was created by my husband using wood, thin dowels (to hold the spools), piano hinges to swing the shelves out, and an “over the door” ironing board mounted to the wall. I use this when I’m sewing garments and need to put the garment around the board to iron a certain area.
Clear boxes with labels help me keep my projects organized
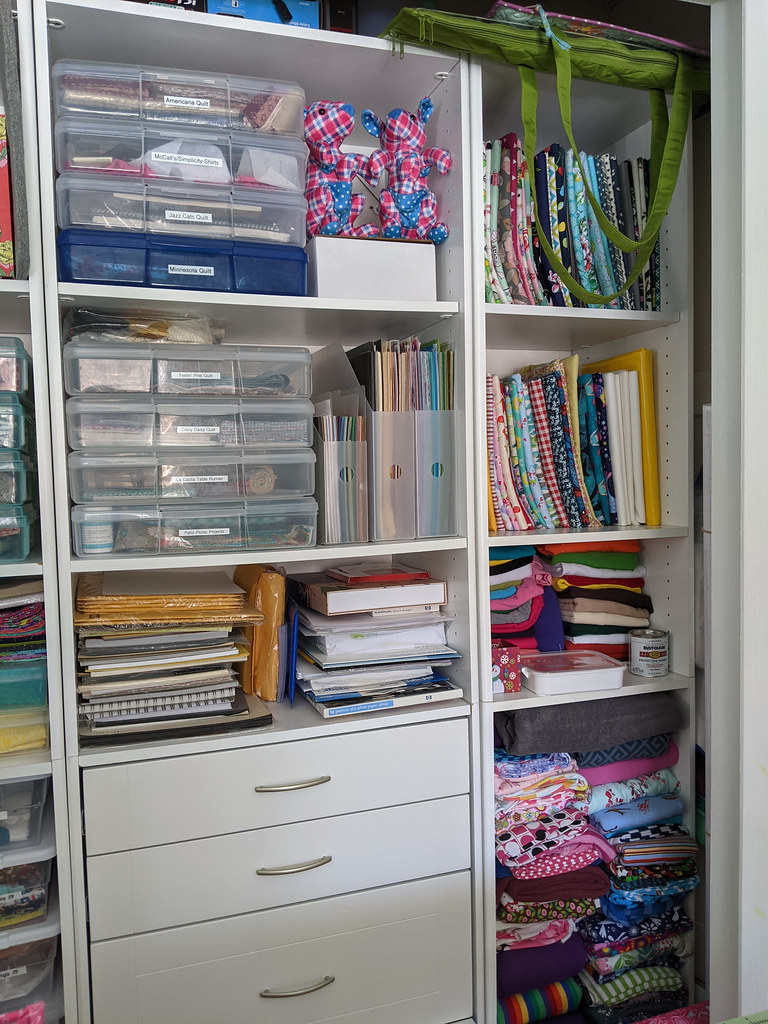
Behind the cutting and pressing area is a closet with a built in ClosetMaid storage system I bought at Home Depot. This is where I store all of my fabric and project kits. On three of the shelves I have stacked clear 12″ x 12″ project boxes (Recollections 12×12 Scrapbook Storage Case and IRIS Portable 12″ x 12″ Project and Scrapbook Case), which I use to store fabric & supply kits for future projects I want to make. I have a lot to do! 🙂 I label each box using my Brother P-Touch Label Maker (which I love) so I can easily keep inventory of what I have. The labels are easily removable so I can reuse the containers and re-label when I change out projects.
Another shelf holds all of my fat quarter sets organized in IRIS Modular Supply Case Size Large clear cases. There is also a shelf for office paper and scrapbook paper. The drawers hold other office supplies and bag making supplies.
On the upper right side of the closet is my quilting cotton yardage wrapped around Ultra Pro Magazine Size Boards (8.5″ x 11″) to keep them neat and tidy. This allows me to see just enough of the fabric so I know what I have, but efficiently store them so they don’t take up too much space. Knit yardage for garments is bulkier so it is folded on the bottom shelves.
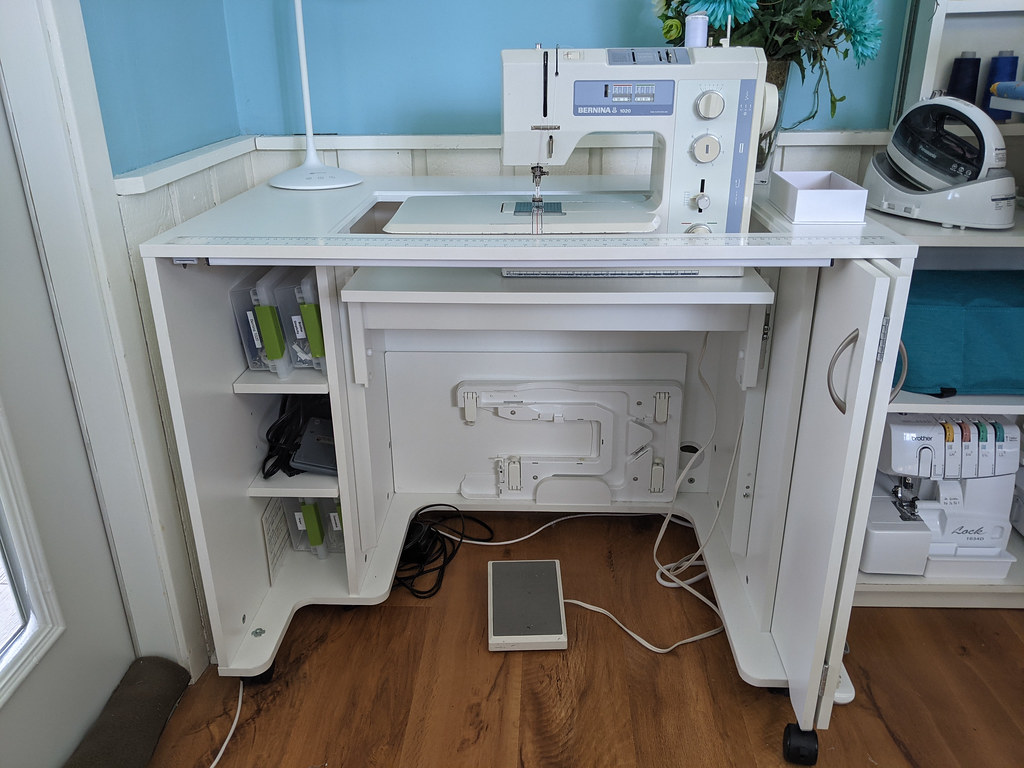
I have a second sewing area next to the cutting/pressing table because any seasoned seamstress seems to collect multiple machines! In my case, the Juki is a straight-stitch-only machine, so I need a second machine with zig zag and other utility stitches used for garment making. I use an older model Bernina 1020 for that!
The sewing desk is the same Arrow Mod Squad Model 2011 Modular Sewing Cabinet as I use for my Juki, however I don’t have an acrylic insert around the machine. Instead it fits pretty nicely in the open space with its own table extension. I adjusted the height of the platform the machine sits on to line it up flush with the table top.
I also have serger and coverstitch machines for garment making. These don’t get used as often, so they are stored on a shelf under my cutting/pressing table and are taken out when needed. I just need to remove the Bernina from the table to use them.
More Storage
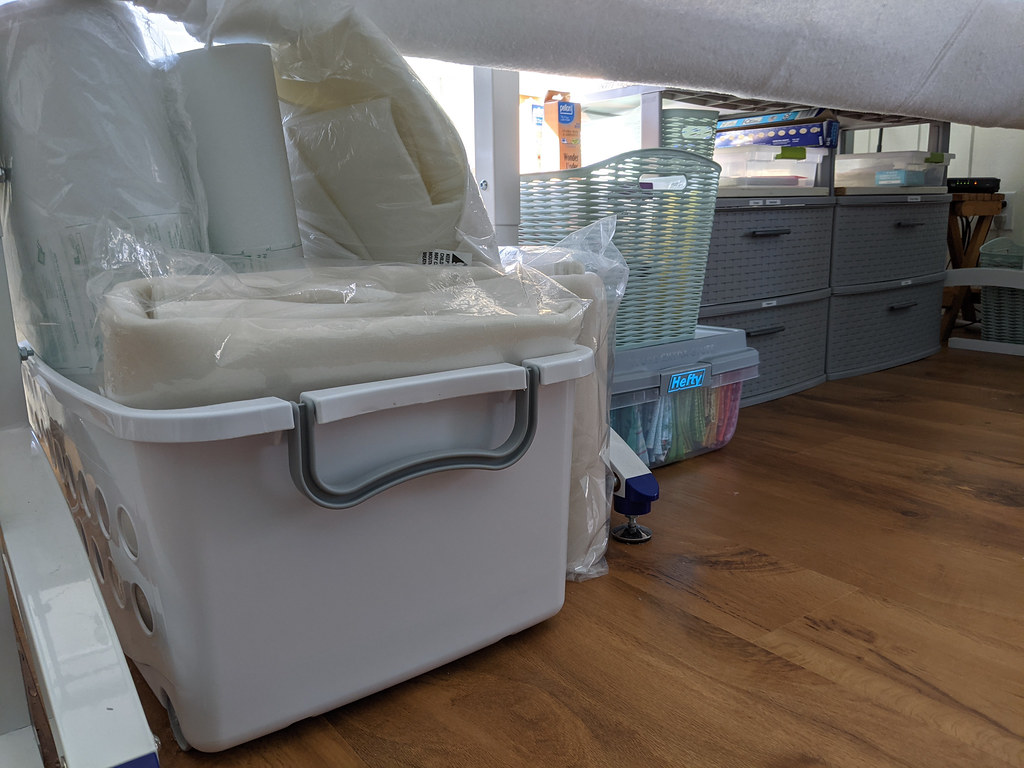
Great storage space under the longarm
The longarm may take up a lot of space in the room, but it does offer a lot of space for storage underneath! I store baskets of batting and interfacing and use a set of drawers to store other supplies such as zippers and paper patterns. The basket I keep my interfacing in is a 26L Wave Design Curved Basket from Target.
Scraps organized by color so I can find just what I need
I got this Hefty 40 Quart Storage Container at Target and found it was perfect to store my fabric scraps. These are each around a fat quarter in size. I don’t usually keep anything smaller than that.