

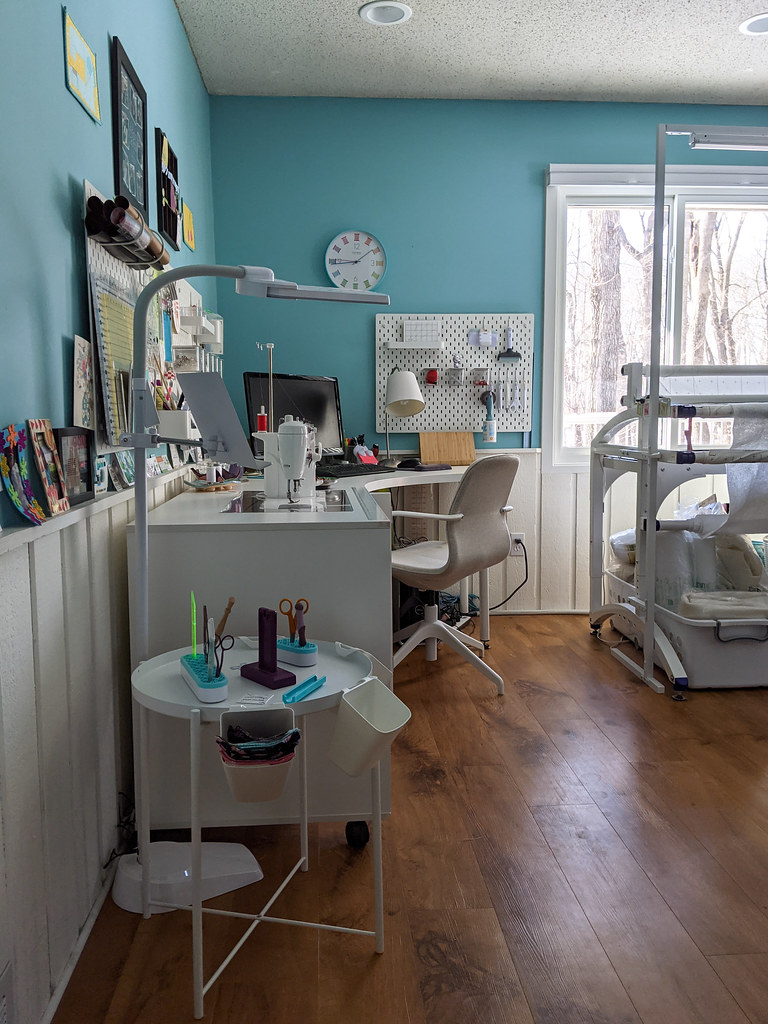
Welcome to my sewing room! This 11-foot x 14-foot space is obviously my favorite room of the house! It started as an office and as my love of sewing grew over the years, my sewing supplies took over the whole room. 🙂 Let me show you the different areas of my room, how I organize them and what products I use. I’ve included a lot of details because I know how inspiring and helpful it is to see how someone else organizes their room!


My layout has changed over the years (most recently when I brought the longarm in last year) but the way it is currently set up is working well. You’ll see I use every inch of space available!
Note: Some product links contained on my site are affiliate links. I earn a small amount if you purchase the item, at no additional cost to you. The products are first and foremost honest recommendations from myself and if you find the recommendations helpful I am thankful if you use my links!
Sewing & Computer Area

The first area you see when you walk in the room is my Juki sewing station and computer desk. The Juki TL-2010Q is my main machine which I use for quilt piecing, bag making, and free-motion quilting. It’s a very popular machine in the quilting and bag-making worlds! I’ve owned it for three years and have loved it from day one! This semi-industrial machine is fast and can plow through as many layers as I throw at it.
For my computer area, I have an Ikea Linnmon Corner Table with Ikea Adils height adjustable legs to make a seamless transition to my sewing table next to it. The chair I use is another Ikea find — Ikea LÅNGFJÄLL chair. I move this chair over to whichever desk I need to use.
The floor lamp next to the sewing desk is the OttLite Dual Shade LED Floor Lamp. It has a handy stand to rest my pattern books or it could be used as a tablet holder with its USB charging outlet.

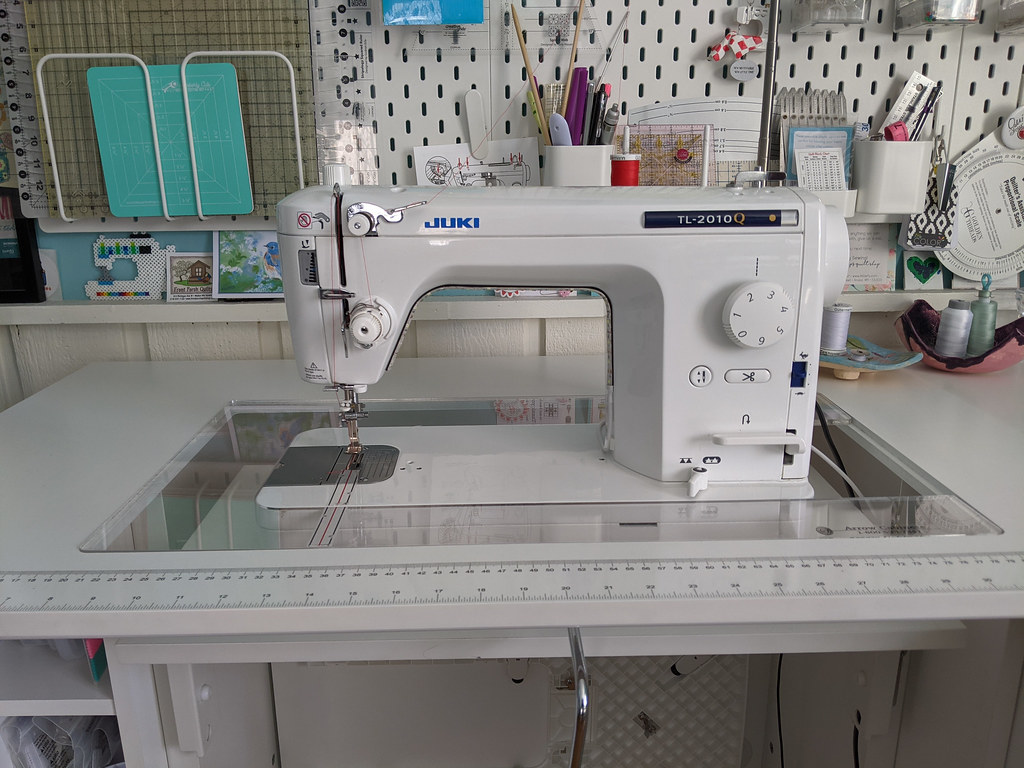
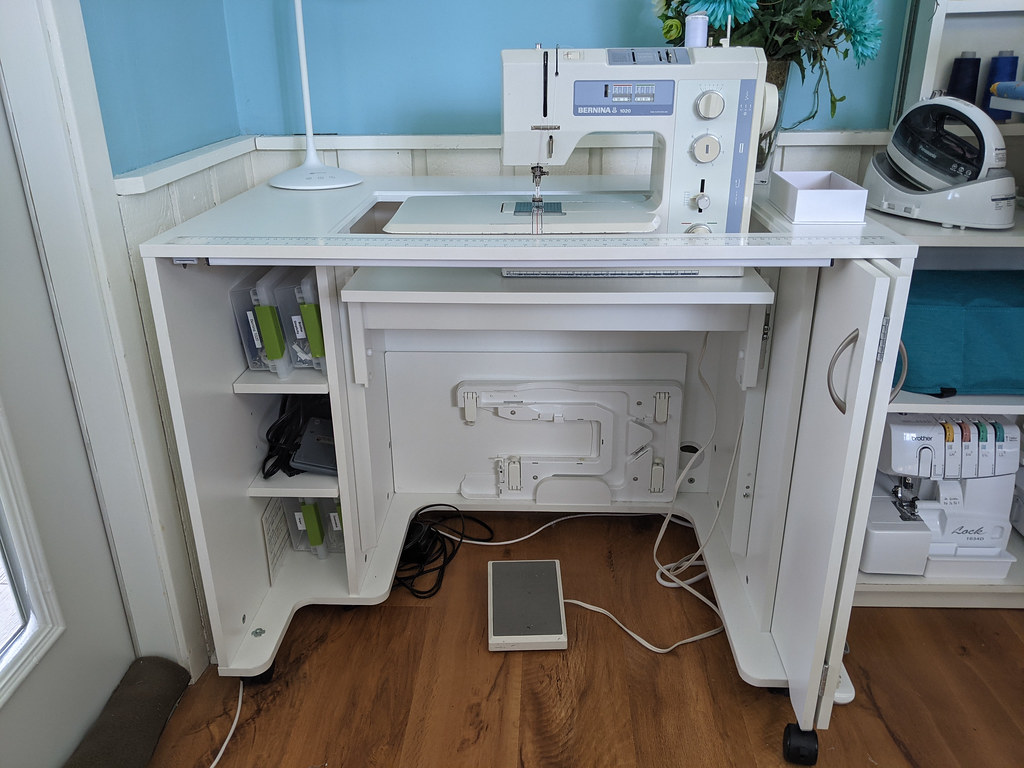
The desk my Juki sits in is an Arrow Mod Squad Model 2011 Modular Sewing Cabinet. I researched many desks before purchasing this one and chose it because the table the machine sits on has a hydraulic lift to adjust it in three different positions: flat bed (pictured), free arm (bottom of machine is flush with the desk top so you can utilize the machine’s free arm) and storage (lowered to the floor inside the desk). It also has an option for a custom acrylic insert to make the machine flush with the table top for easier free-motion quilting (pictured). Arrow Cabinets has an entire line of “Mod Squad” cabinets that can be used together: Mod Squad System.
The desk is very sturdy, yet is easy to move around the room if needed since it is on wheels. When the machine table is lowered to the floor for storage, you can put the included white wood insert over the opening to use the desk for another purpose, making it very versatile. The desk also has a door that can be pulled closed when not in use. When open, the door tucks into the right side of the desk (pictured). The majority of the time mine is open!
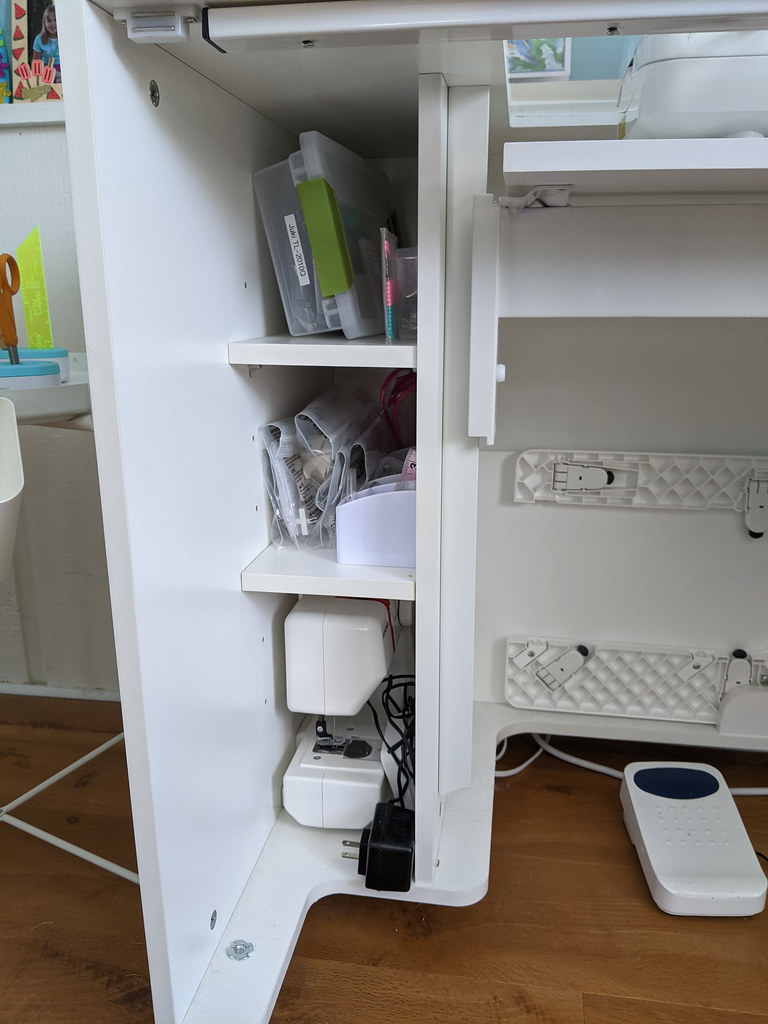
The storage shelves in the desk are just the right size to hold my sewing machine supplies and a mini machine for my daughter. I have a Sterilite Small Clip Box for each of my machines (shown on the top shelf) which contains all the tools that came with the machine and the feet. The box fits great on the top shelf and is easy to grab and take with to retreats without having to worry if I forgot anything!
Sewing Machine Desk Area Products
sewing desk: Arrow Mod Squad Model 2011 Modular Sewing Cabinet
computer desk: Ikea Linnmon Corner Table
chair: Ikea LÅNGFJÄLL chair
wall clock: Moda Sewing Room Wall Clock (now discontinued)
Juki sewing machine: Juki 2010q Sewing and Quilting High Speed Semi-Industrial Machine
container for sewing machine supplies and feet: Sterilite Small Clip Box
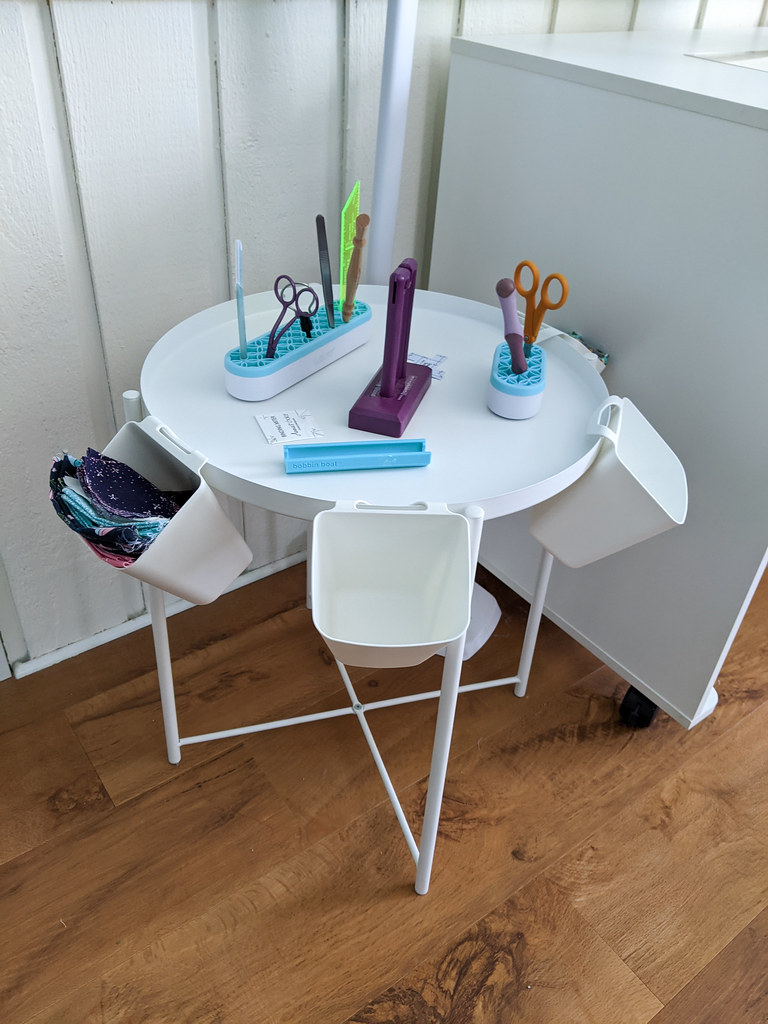
I have a handy Ikea Gladom Tray Table next to my machine with all the supplies I need close at hand while sewing. I pull the table right next to me when I’m sewing. I hooked Ikea SUNNERSTA containers on the rim of the table to hold my starter fabric scraps for chain piecing and I also use a couple as convenient trash cans for my thread clippings.
What's on my table?
These are my favorite and most-used tools!
tool table: Ikea Gladom Tray Table
containers hanging from tray table: Ikea SUNNERSTA Container
purple thread cutter: The Gypsy Quilter Cutting Gizmo (mine) or Chain Piece Thread Cutting Gizmo (new version)
bobbin holder: Dritz Bobbin Boat
aqua tool holders: Stash 'n Store Large and Stash 'n Store Mini
wood stiletto: ByAnnie Stiletto and Pressing Tool
tool for removing needle from sewing machine: Needle Grabber
purple scissors: The Gypsy Quilter Mini Duckbill Scissors
orange scissors: Fiskars 5" Micro Tip Scissors
purple seam ripper: Dritz Ergonomic Seam Ripper
aqua seam remover blade: Kai Seam Remover (this is a super easy way to seam rip!)
yellow seam guide ruler: Stitcher's Friend 9 Tools in One Ruler
white seam gauge: Dritz 4 in 1 Measuring Gauge
white binding miter tool: Perfect Binding Miter Tool

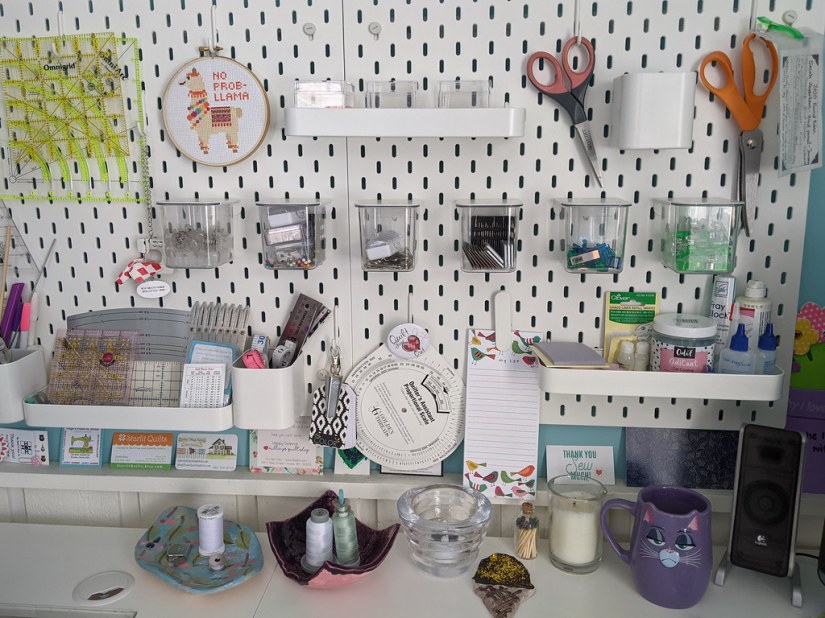

Above the desks are peg boards filled with all of my miscellaneous tools and small rulers. I chose to use the Ikea peg board system because I love all the accessories you can attach to it! There’s another peg board near my computer desk with supplies for my Cricut Maker cutting machine. I use it to cut fabric, which is a real time-saver!
Tool Storage Products
3 peg boards for sewing supplies: IKEA Skadis Pegboard White Size 22x22
1 peg board for Cricut supplies: IKEA Skadis Pegboard White Size 30x22
Storage for medium rulers and mats: IKEA Skadis Letter Holder
Storage for vinyl rolls and free-motion quilting surface rolls: IKEA Skadis Holder White
Hooks for small rulers and scissors: IKEA Skadis Hook White
White cups for marking tools and measuring tapes: IKEA Skadis Container White
Tray for more small rulers and jars: IKEA Skadis Shelf
Clear cups for pins, needles, and clips: IKEA Skadis Container with Lid White
Clips for important papers: IKEA Skadis Clip White
Longarm

After finding a love of doing free-motion quilting and realizing wrestling a large quilt on my Juki sewing machine was getting tiring, I set out to buy a longarm. Already a big Juki fan, I chose the Juki Miyabi J-350QVP Longarm with an 18-inch throat space on a 7-foot table. Seven feet is definitely the largest frame I could fit with my current furniture configuration, but so far it’s been the perfect size for the throw-sized quilts, wall hangings, and table runners I make.
The DIY light bar above my longarm was made by my husband. He used aluminum poles, brackets, and LED strip lights from Menards. I was in charge of spray painting the poles white. 🙂 It provides awesome light for my late-night quilting!
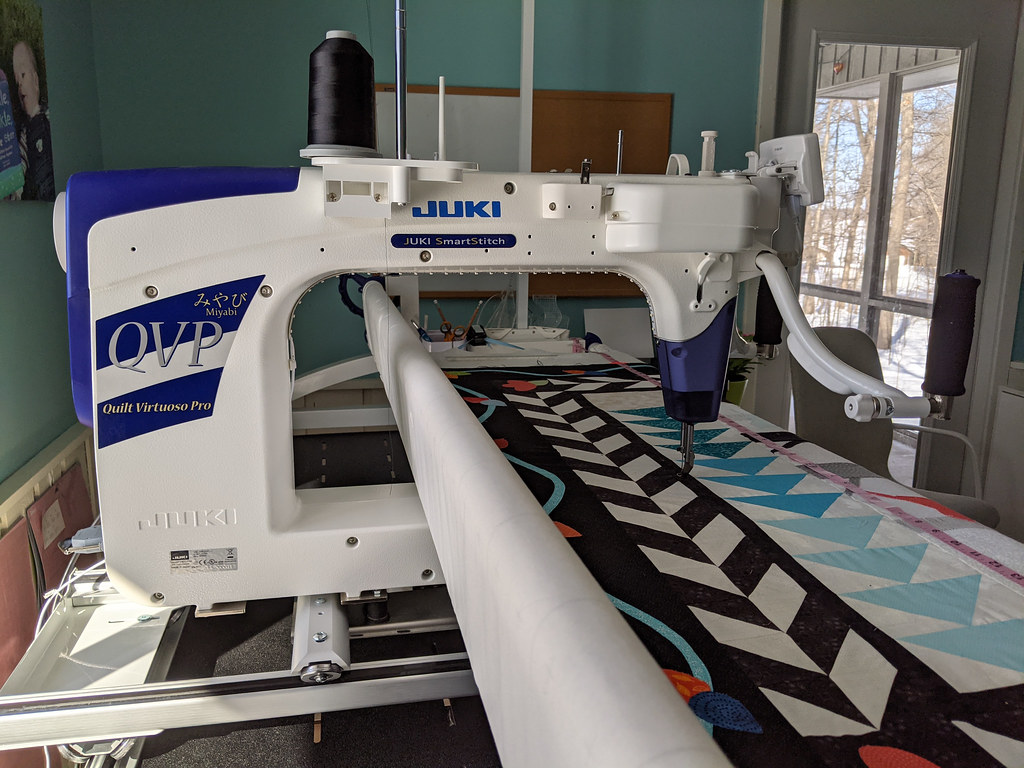


I have found having tools within easy reach while quilting is very important. I’m always needing to snip a thread or (unfortunately) sometimes rip some stitching out. I put these tools along with some marking pencils in magnetic cups on both ends of the frame, utilizing the magnetic frame to my advantage. This called for getting duplicates of the tools so I can reach them from both sides, but it’s so much more convenient and helps me go faster!
The other smart storage solution I came up with is hanging good ol’ Ikea SUNNERSTA containers on the side of my frame. It has the perfect lip to do so! These cups are a perfect place to store my quilting rulers and keep them easy to grab!
Longarm Area Products
longarm machine: Juki Miyabi J-350QVP Longarm
hanging cups for rulers: Ikea SUNNERSTA Container
magnet cups for scissors/seam rippers/marking tools: 3 Pack Magnetic Pencil Marker Pen Holder
side grip system to hold the sides of the quilt taut: Side Grips by Leader Grips (size 10")
pink measuring tape for centering the quilt: LongArm Centering Tape
favorite quilting rulers: Natalia Bonner's 4-N-1 Machine Quilting Ruler, Inside Out Quilting Ruler, 12" x 2" Quilting Ruler, and Angela Walters' Slim Quilting Ruler
Cutting & Pressing

My cutting and pressing table is located opposite of the longarm. When I first got the Studio Designs Sew Ready Hobby and Craft Table, I quickly realized how great it is to be able to cut and iron at a standing height. I previously was leaning down on a regular desk or on the floor! This table not only is height adjustable, but also has the ability to fold down each side of the table leaving a small center section to reduce its footprint. I have to admit my table is fully extended most of the time, but it is a nice feature if you are in a small space! I also love the bottom ruler storage shelf and sliding metal baskets for ironing supplies under the table.
The tan anti-fatigue standing mat in front of the table is a recent purchase and I’m not sure how I lived without it. I got an extra long Kangaroo Original Standing Mat (60″ x 20″) which conveniently spans the entire table length and also can cover most of the longarm length! I push it to whichever area I’m using and it really makes standing for long periods more comfortable!

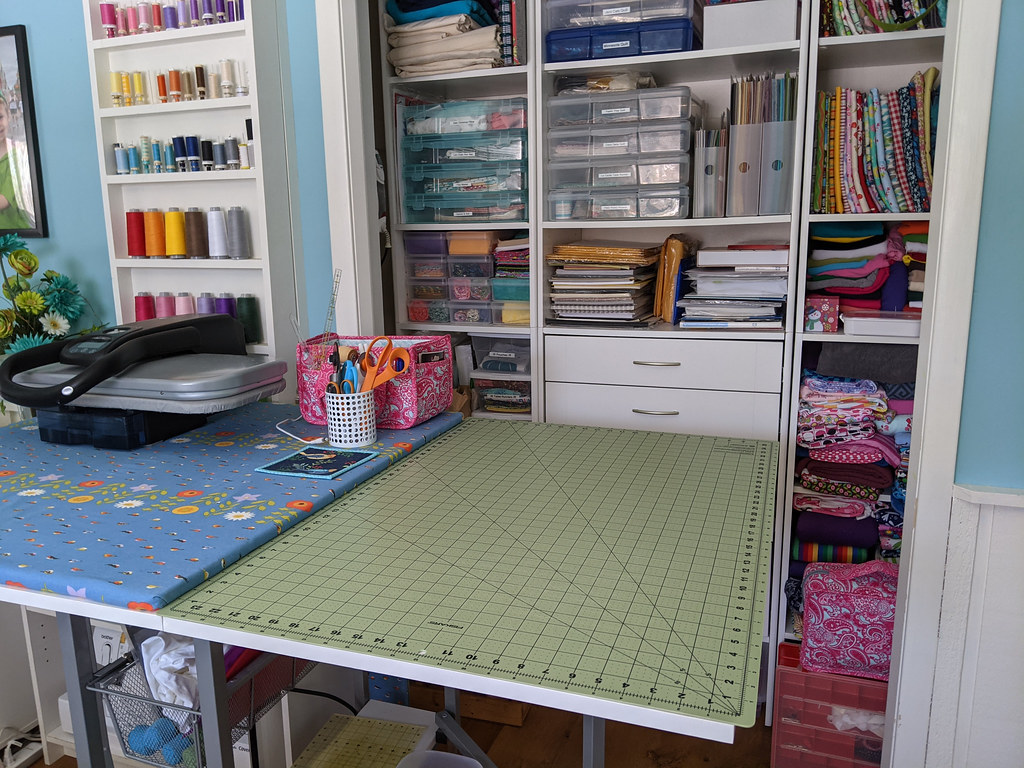
I have designated an ironing and cutting side to the table, but at times if I have something large to cut out I can remove the ironing board to add a second 24″ x 36″ cutting mat. My ironing board is a DIY creation using plywood covered with batting and a decorator-weight fabric. The best way for a custom-sized ironing surface!
The iron I use is a Panasonic NI-WL600 Cordless Iron. Using a cordless iron is a dream in a tight space! No cord to fight with! When I need to fuse big pieces of interfacing for a bag or press quilt blocks flat, I pull out my Singer 26″ Intelligent Steam Press which sits on top of the table for lack of a better location. This is another dream machine. It really cuts down on my ironing time and provides a much better fuse/press than a regular-sized iron!
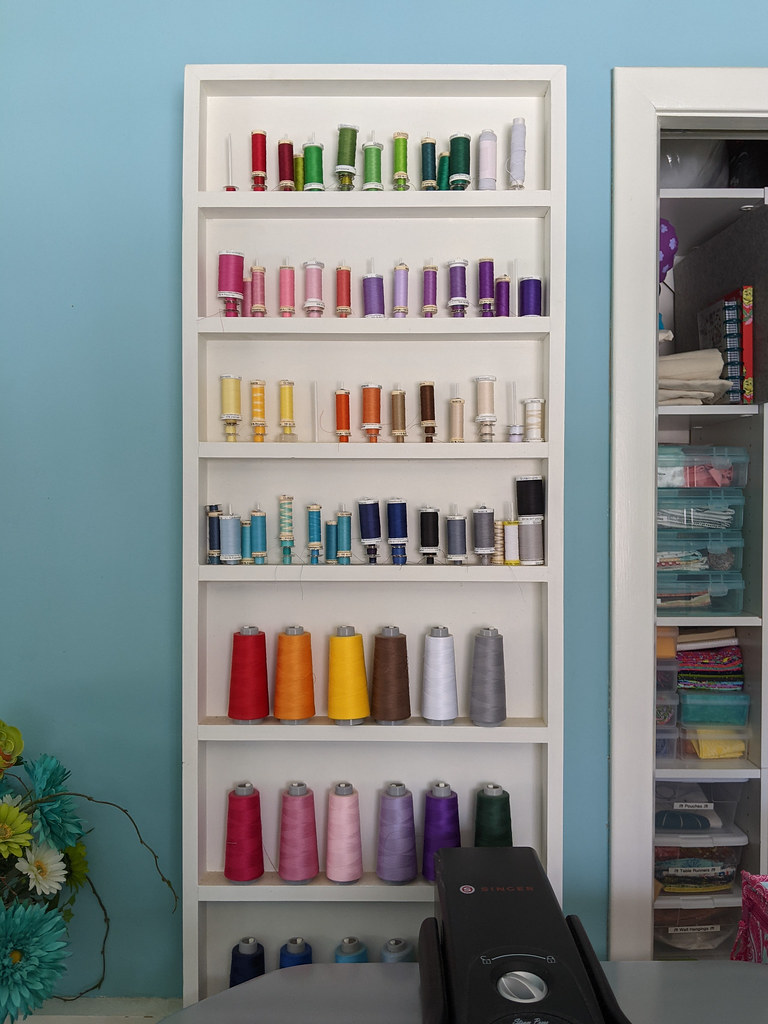

You’ll also see I have another ironing board hidden behind my thread shelves on the wall! This DIY solution was created by my husband using wood, thin dowels (to hold the spools), piano hinges to swing the shelves out, and an “over the door” ironing board mounted to the wall. I use this when I’m sewing garments and need to put the garment around the board to iron a certain area.
Cutting and Pressing Products
table: Studio Designs Sew Ready Mobile Height Adjustable Hobby and Craft Cutting Table
floor mat: Kangaroo Original Standing Mat (60" x 20")
cutting mat: Fiskars 24x36 Inch Eco Cutting Mat
cordless iron: Panasonic NI-WL600 Cordless Iron
steam press: Singer 26" Intelligent Steam Press
ironing board on table: DIY using How to Build Firm Pressing Board tutorial
ironing board on wall: Over The Door Ironing Board (similar to this one)
Fabric & Project Storage

Behind the cutting and pressing area is a closet with a built in ClosetMaid storage system I bought at Home Depot. This is where I store all of my fabric and project kits. On three of the shelves I have stacked clear 12″ x 12″ project boxes (Recollections 12×12 Scrapbook Storage Case and IRIS Portable 12″ x 12″ Project and Scrapbook Case), which I use to store fabric & supply kits for future projects I want to make. I have a lot to do! 🙂 I label each box using my Brother P-Touch Label Maker (which I love) so I can easily keep inventory of what I have. The labels are easily removable so I can reuse the containers and re-label when I change out projects.
Another shelf holds all of my fat quarter sets organized in IRIS Modular Supply Case Size Large clear cases. There is also a shelf for office paper and scrapbook paper. The drawers hold other office supplies and bag making supplies.
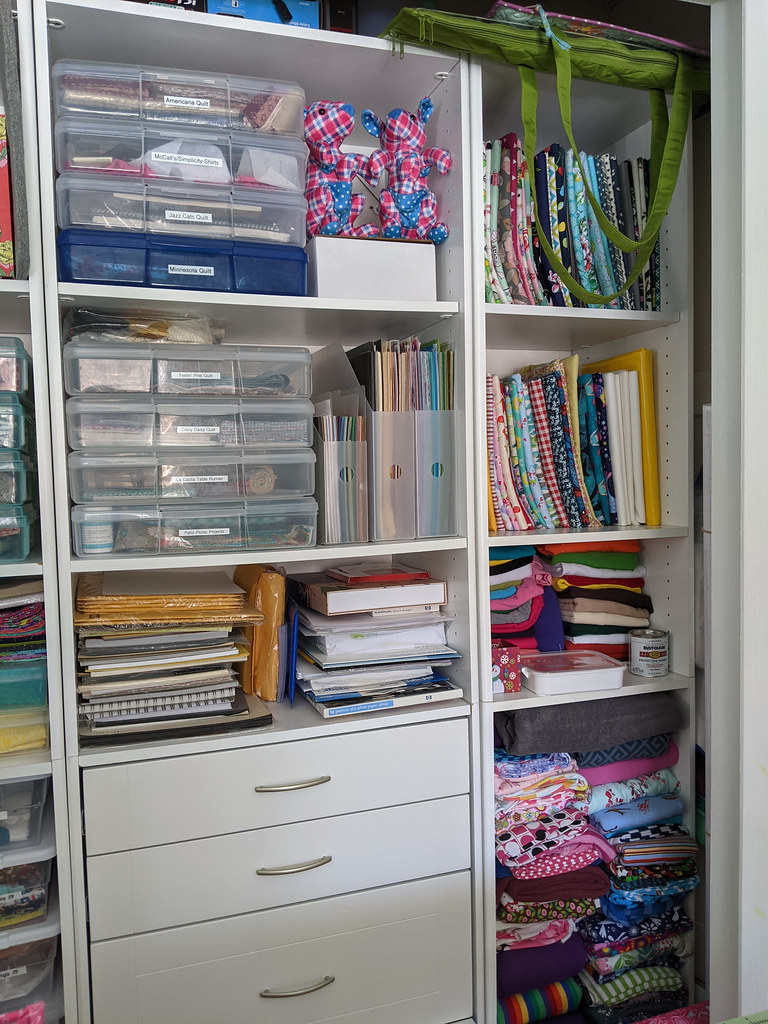
On the upper right side of the closet is my quilting cotton yardage wrapped around Ultra Pro Magazine Size Boards (8.5″ x 11″) to keep them neat and tidy. This allows me to see just enough of the fabric so I know what I have, but efficiently store them so they don’t take up too much space. Knit yardage for garments is bulkier so it is folded on the bottom shelves.
Fabric Storage Products
project boxes: Recollections 12x12 Scrapbook Storage Case and IRIS Portable 12" x 12" Project and Scrapbook Case
label maker to label boxes: Brother P-Touch Label Maker
fat quarter cases: IRIS Modular Supply Case Size Large
yardage storage on magazine boards: Ultra Pro Magazine Size Boards (8.5" x 11")
Second Sewing Area

I have a second sewing area next to the cutting/pressing table because any seasoned seamstress seems to collect multiple machines! In my case, the Juki is a straight-stitch-only machine, so I need a second machine with zig zag and other utility stitches used for garment making. I use an older model Bernina 1020 for that!
The sewing desk is the same Arrow Mod Squad Model 2011 Modular Sewing Cabinet as I use for my Juki, however I don’t have an acrylic insert around the machine. Instead it fits pretty nicely in the open space with its own table extension. I adjusted the height of the platform the machine sits on to line it up flush with the table top.
I also have serger and coverstitch machines for garment making. These don’t get used as often, so they are stored on a shelf under my cutting/pressing table and are taken out when needed. I just need to remove the Bernina from the table to use them.
More Storage
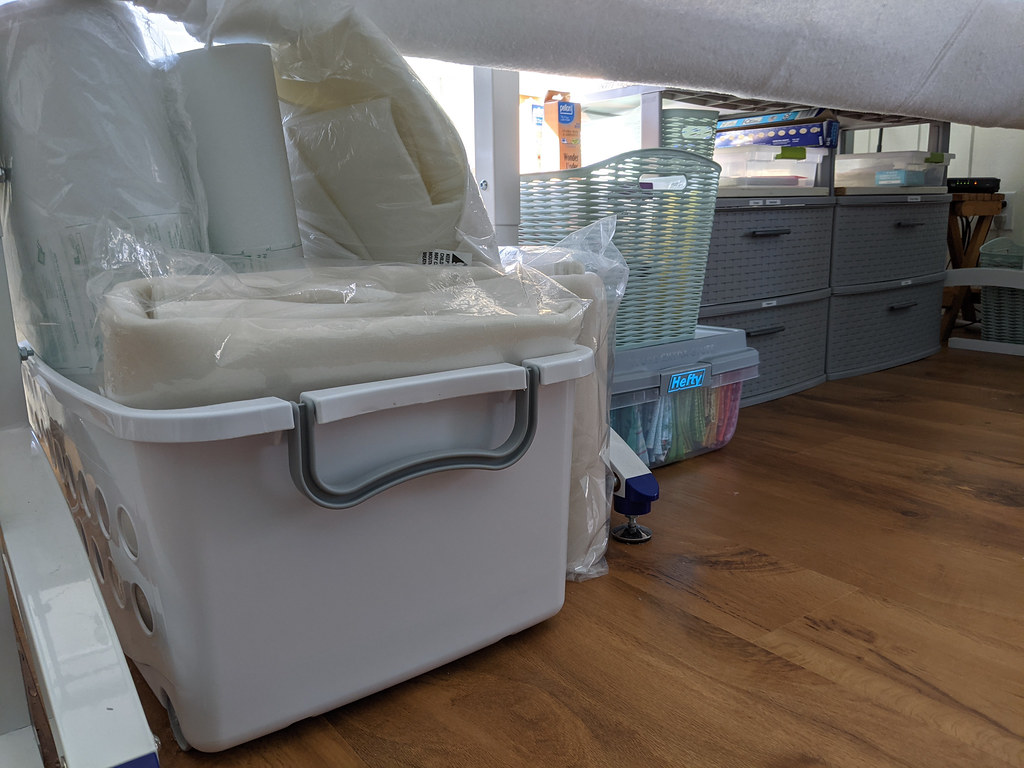

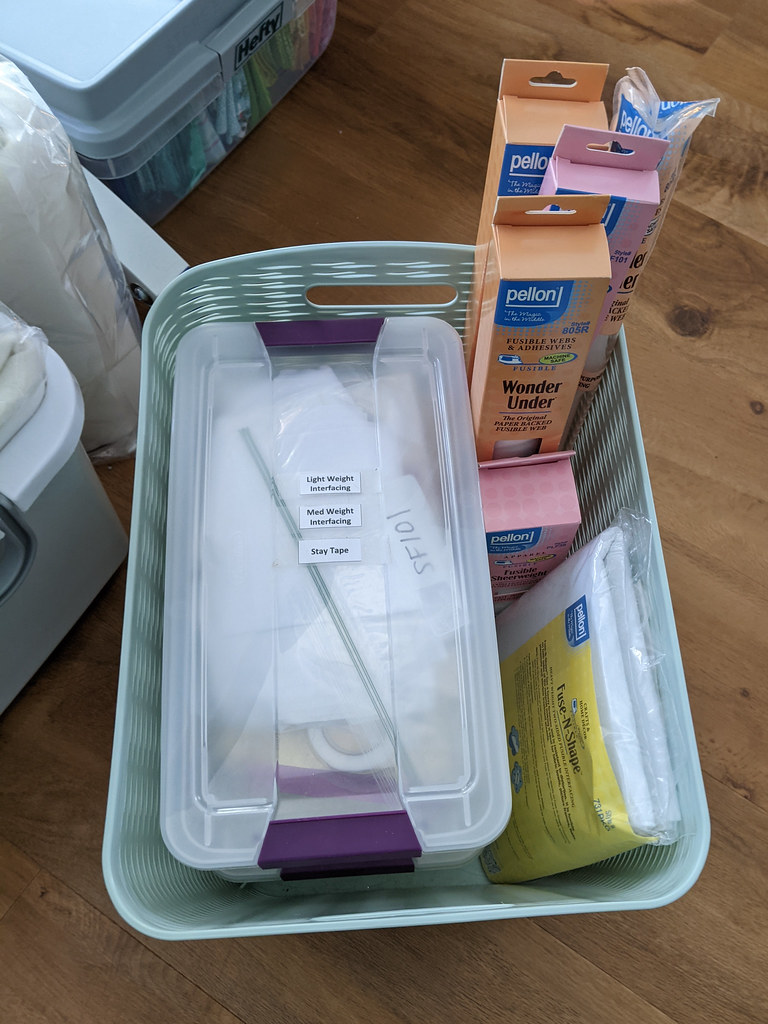
The longarm may take up a lot of space in the room, but it does offer a lot of space for storage underneath! I store baskets of batting and interfacing and use a set of drawers to store other supplies such as zippers and paper patterns. The basket I keep my interfacing in is a 26L Wave Design Curved Basket from Target.

I got this Hefty 40 Quart Storage Container at Target and found it was perfect to store my fabric scraps. These are each around a fat quarter in size. I don’t usually keep anything smaller than that.
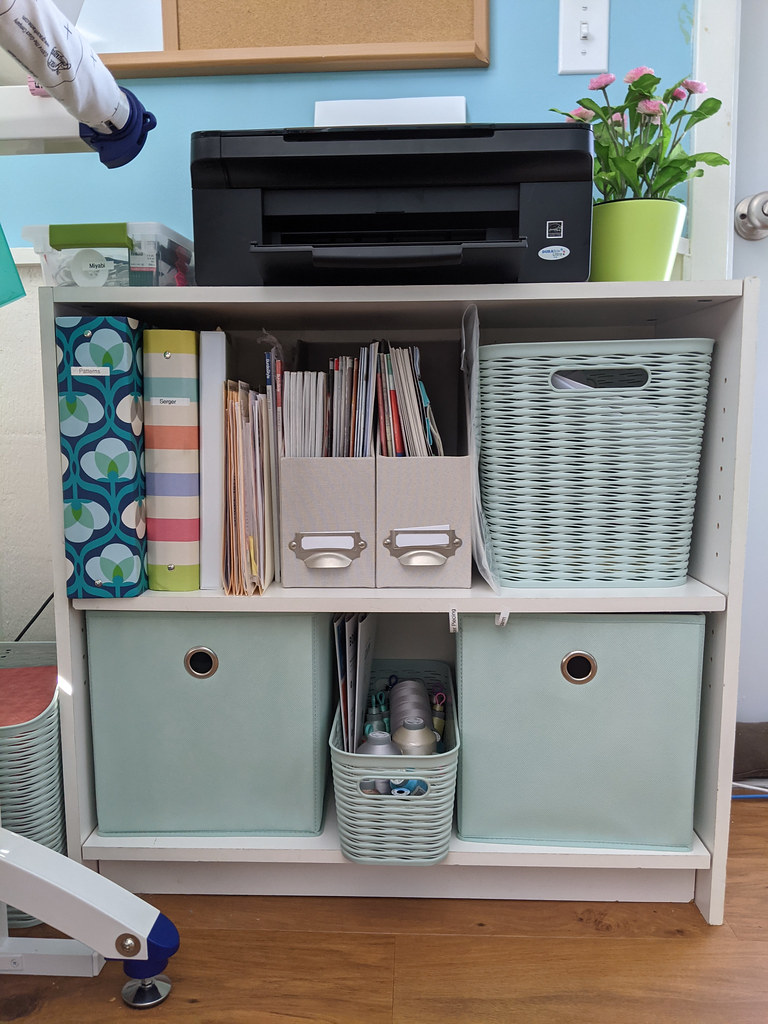
Next to the longarm is a small bookcase that I use as a printer stand and more storage for miscellaneous items like quilting thread, magazines, manuals, pattern binders, and a bin for my label maker. I use coordinating 11″ 16L Wave Design Cube Basket and 5L 1/2 Medium Wave Design Rectangle Basket weaved bins and Fabric Cube Storage Bin 11″ – Room Essentials cube boxes from Target.
Storage Products
fat quarter clear container: Hefty 40 Quart Storage Container
large weaved bin: 26L Wave Design Curved Basket
medium weaved bin: 5L 1/2 Medium Wave Design Rectangle Basket
small weaved bin: 11" 16L Wave Design Cube Basket
cubes: Fabric Cube Storage Bin 11" - Room Essentials
Well, that wraps up the tour of my room! I spend a lot of time in it working on my creations, so it needs to be functional and fun!

Beautiful space and awesome organization!
LikeLike
Thank you!
LikeLike
Amazing space. So organized. I just bought a used White 162 today without a manual. Motor runs well. Wondering how to thread it properly.
LikeLike